How to Create a Portfolio Website: A Detailed Guide

How to Create a Portfolio Website
A Detailed Guide
In this simple step-by-step guide I’ll take you through the entire process of creating a compelling personal portfolio website to display your best work, and eventually get you hired.
The process includes four essential steps and will take you no longer than 20 minutes. It will cover all the web design knowledge gaps and make it possible to have a stunning portfolio website without having to touch any line of code.
Step 1: Picking a domain name
Before we jump into building the website, let’s quickly go over domain names.
Almost every hosting company sells domain names. When purchasing a hosting plan (we will discuss this in step 2), most hosting companies do provide a one-year free domain name for you.
When picking a domain, you might feel an urge to be creative, or even funny. The best advice I can give you is to keep it simple.
Should you use your name as the domain name?
I highly recommend using your exact name for the domain. The reason is that it is the best way to make sure your website is the first thing that comes up when people search for you online. Otherwise, they might run into your personal Facebook page or other random pages that has nothing to do with you.
It’s best to have as much control over the search results for your own name as possible, and a domain for your name is the best way to do so.
If the domain for your name isn’t available, try adding a word at the end, like “johndoeportfolio.com” or “johndoeart.com”. The important thing is to have your full name in there.
Step 2: Get your portfolio website online
The next step is set up where your website will be hosted. For this guide I’ll cover 3 options, one for each type of user.

How to get your portfolio website online using Wix
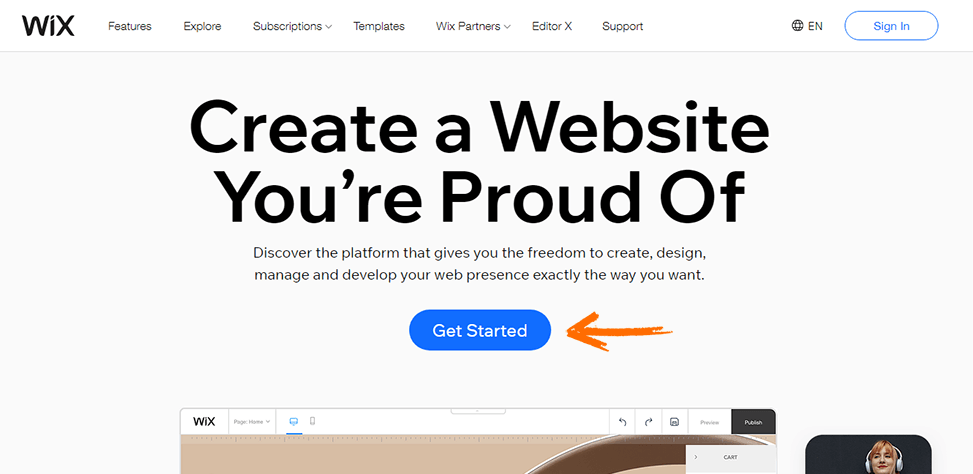
Wix is a website builder that anyone, with zero experience in web design, can use to build a professional-looking website in minutes. Wix is very popular because of its flexibility and ease-of-use. In this section, we will go over creating a personal portfolio website using Wix.com.
Create an Account
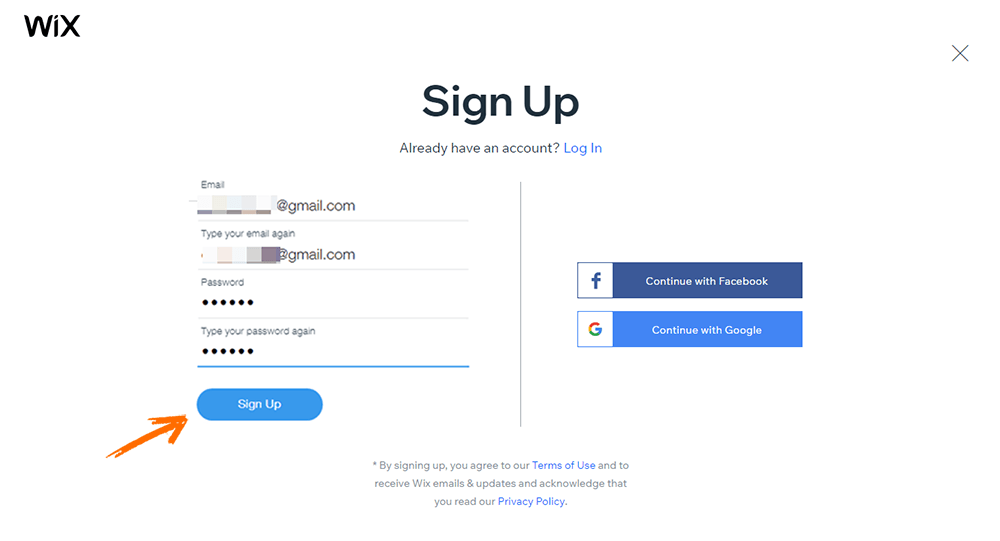
Creating an account on the Wix website builder is very straightforward. You can even sign up with your Google or Facebook accounts.
Visit the homepage www.wix.com, and click on Get Started.
You will be redirected to the Sign Up page. Enter your email address and a new password, then click on the Sign up button.
The next step is a little survey to help Wix know about your needs so they can provide you with the best possible experience. You can choose to answer the survey or skip it.
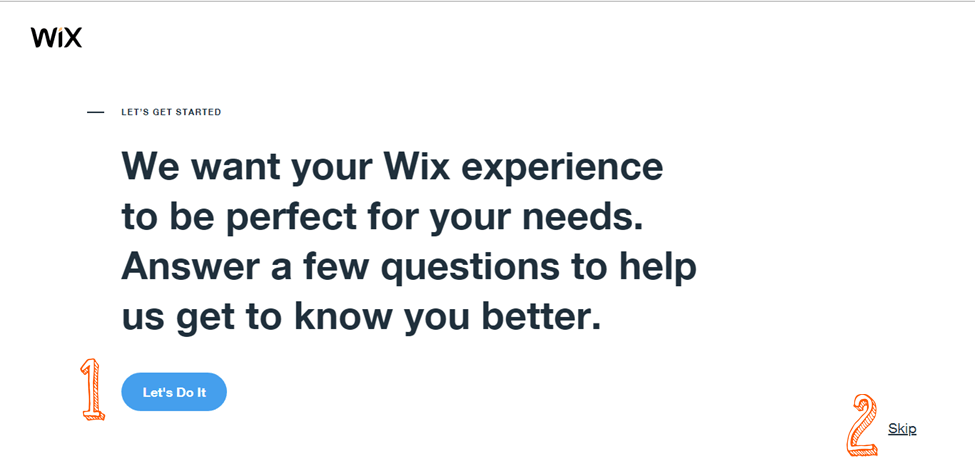
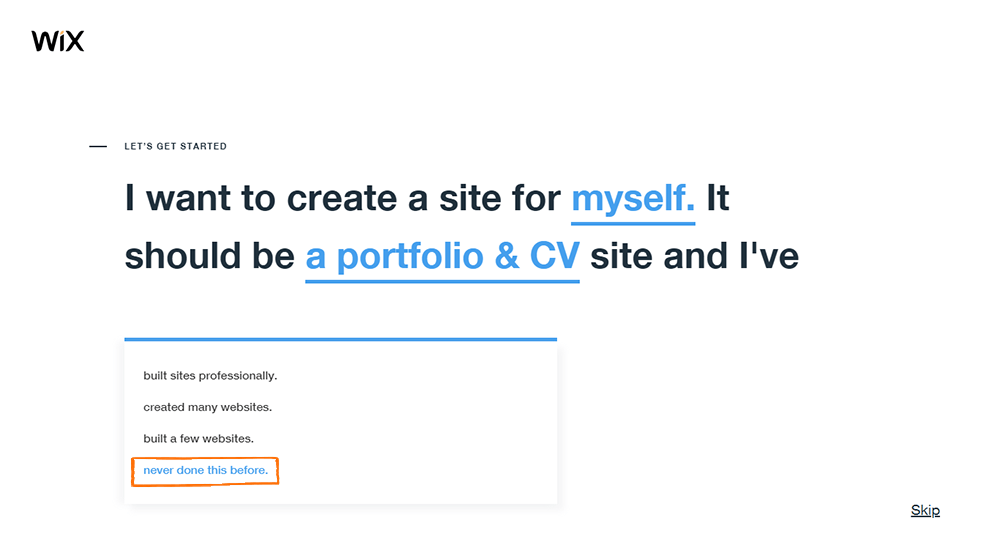
The survey is comprised of just three questions and will take less than 30 seconds to complete. Choose never done this before, as this guide is meant for both the beginners and advanced users.
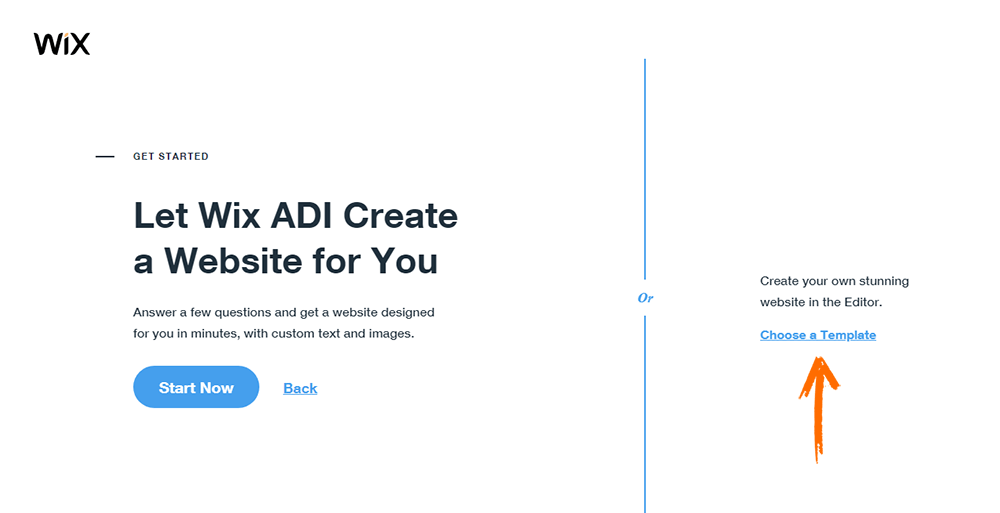
Once you select the last option, you’ll be redirected to the next page where you’ll be given an option to choose between using the Wix’s Artificial Intelligence Designer or the Wix website Editor to create your website.
Using Wix’s Artificial Intelligence Designer (ADI) to create a portfolio website
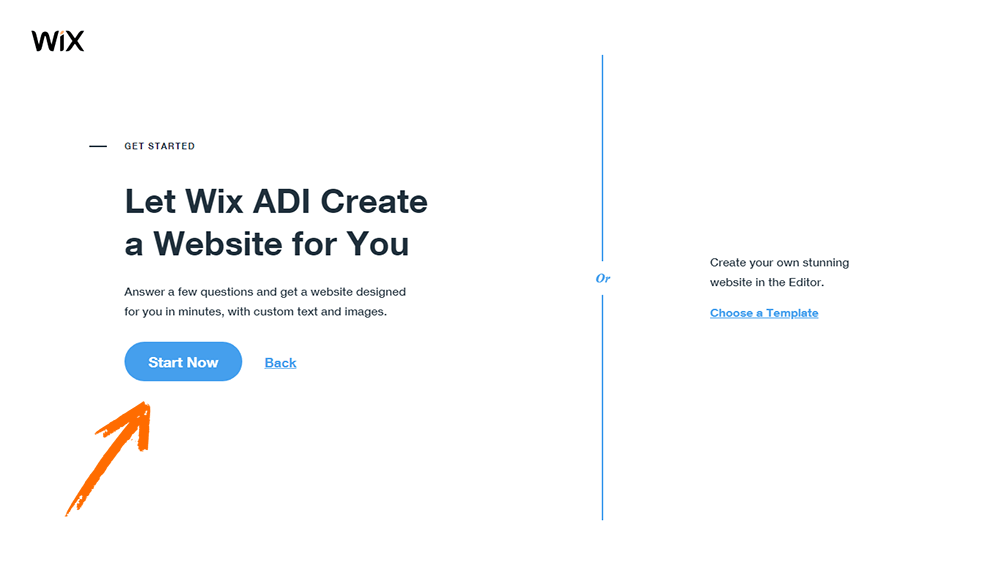
Click on “Start Now” to use the Wix ADI or “Choose a Template” to create your own stunning website using the Wix Website Editor. In this guide, we will be exploring both, starting with the Wix ADI option, which is the best option for non-web developers.
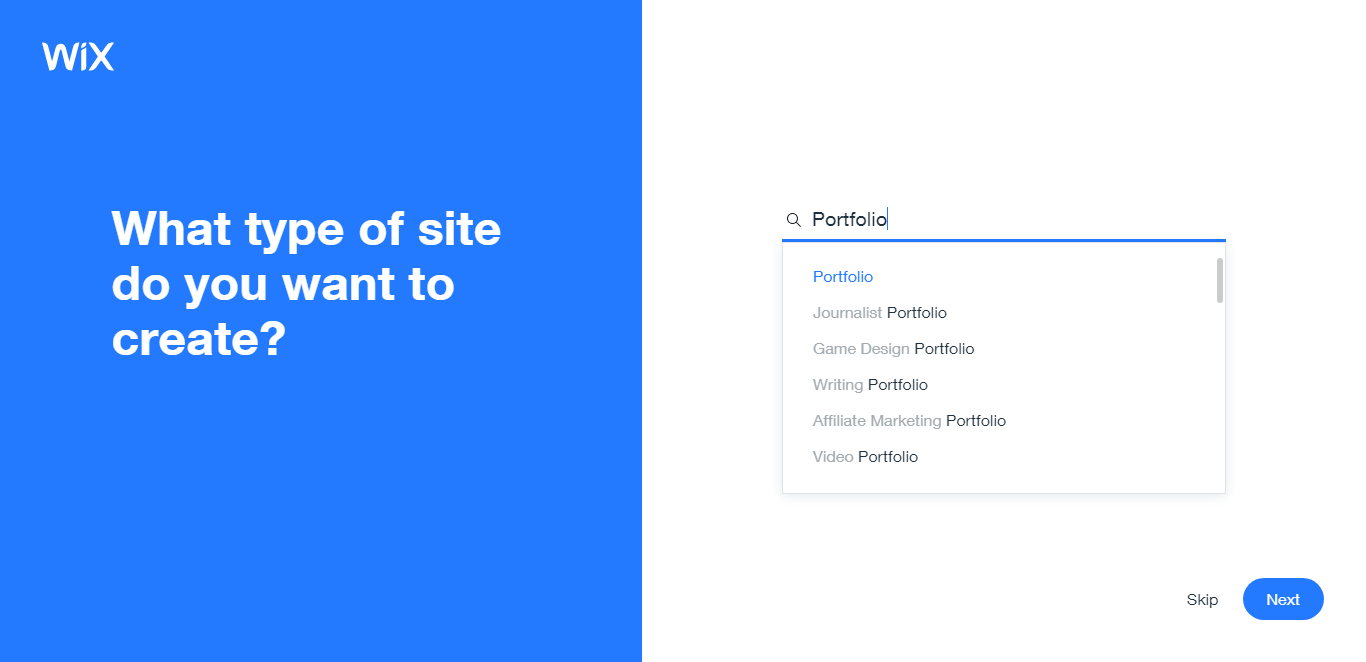
Choose the type of website you want to create; in this case, a portfolio website. Click next to choose what features you want on the website.
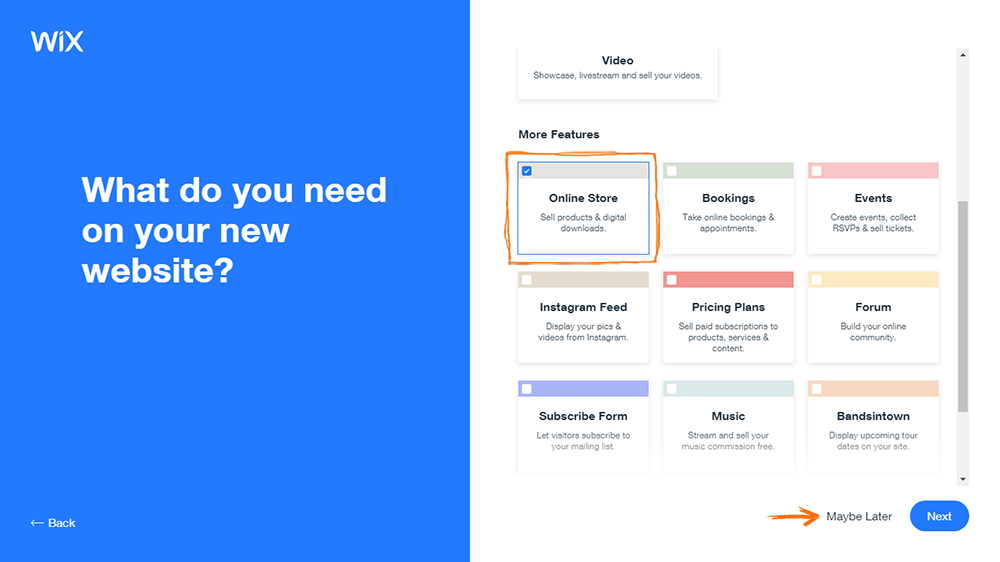
We chose the “online store” here, because we will be displaying our work and visitors should be able to contact and hire you. Note that you can choose to skip this step and add features later. After that, click on Next.
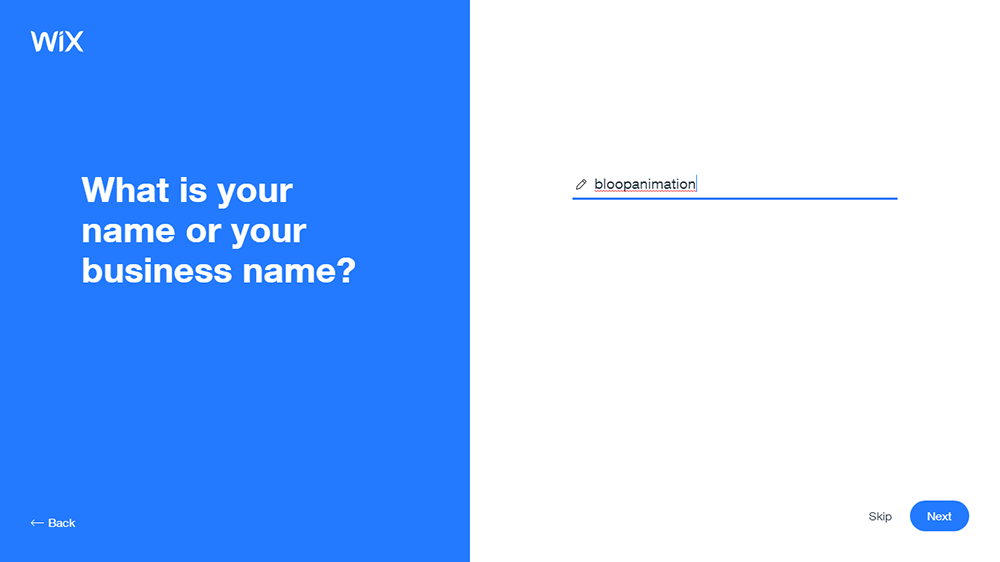
Choose a brand/business name, or use your own name. Whatever you choose here will be used as your domain name. We used our brand name, “bloopanimation” as an example. Click Next.
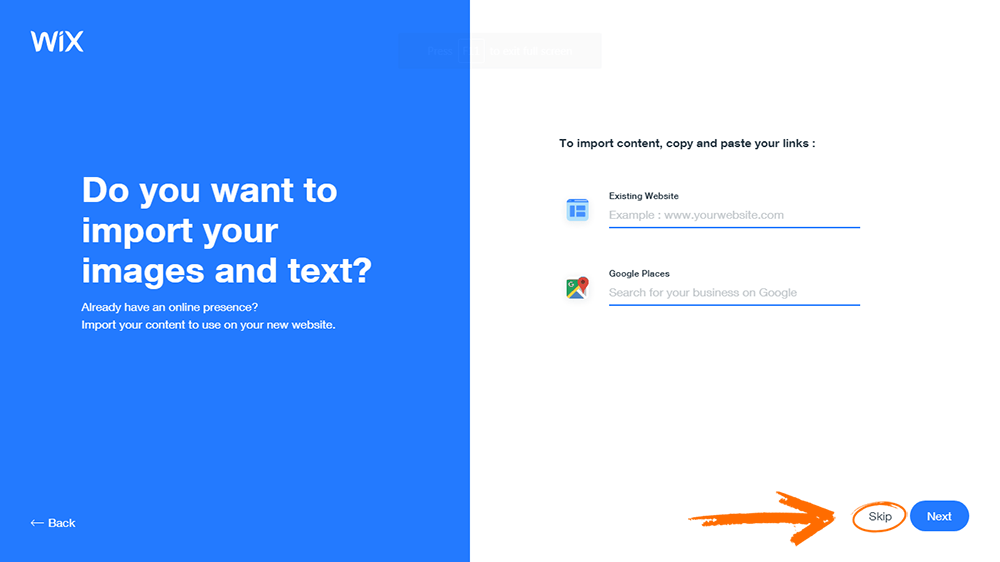
Since we are working on a new project, it is assumed we don’t have an existing website or Google places, so we’ll click on “Skip” to review and edit our info.
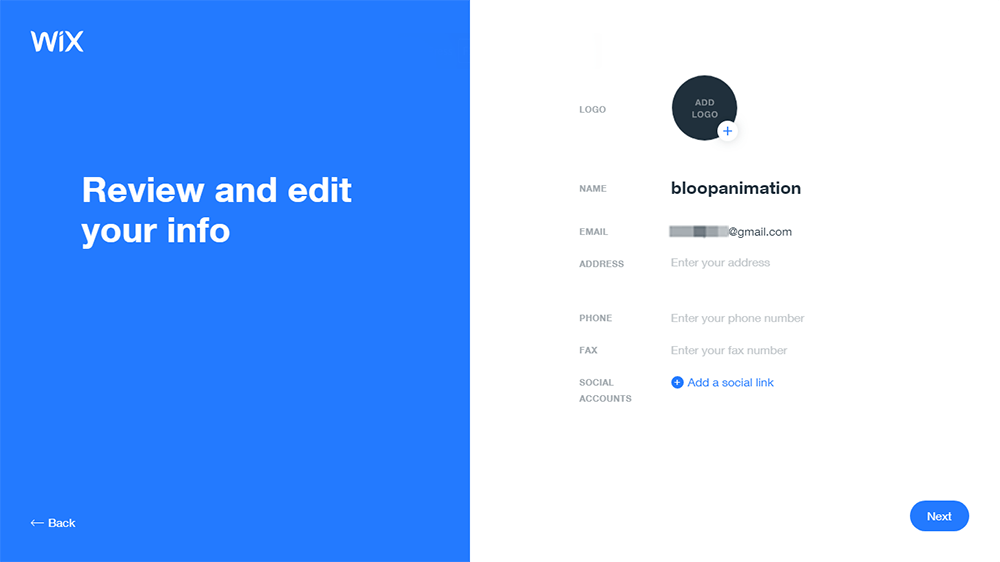
Fill up the fields provided; your email is already there. Add your logo, address, phone number, fax (if you have one), and social accounts links.
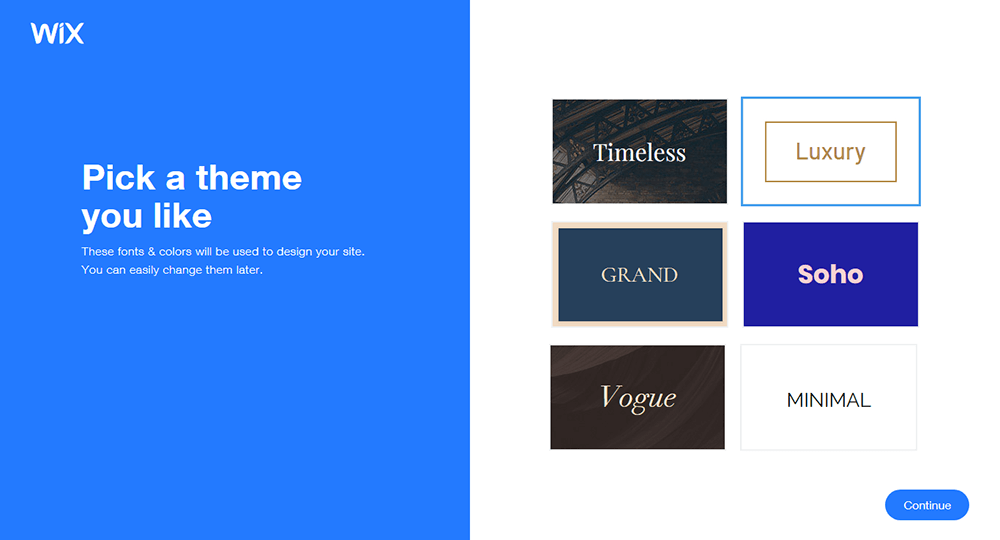
On the next page, choose a theme for your website (you can easily change themes later). Select one and click continue.
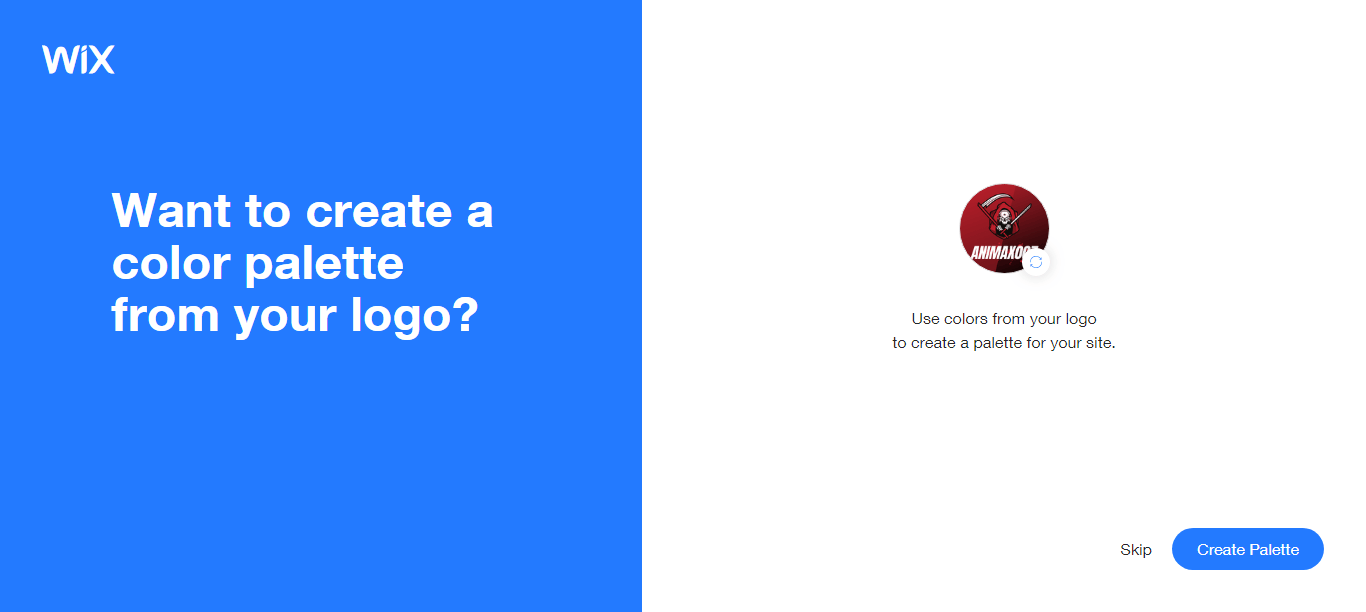
If you uploaded a logo, you’ll have an option to create a color palette from that logo. You can skip if you don’t have one, or click “Create Palette” to continue.
The next step is to choose a homepage design.
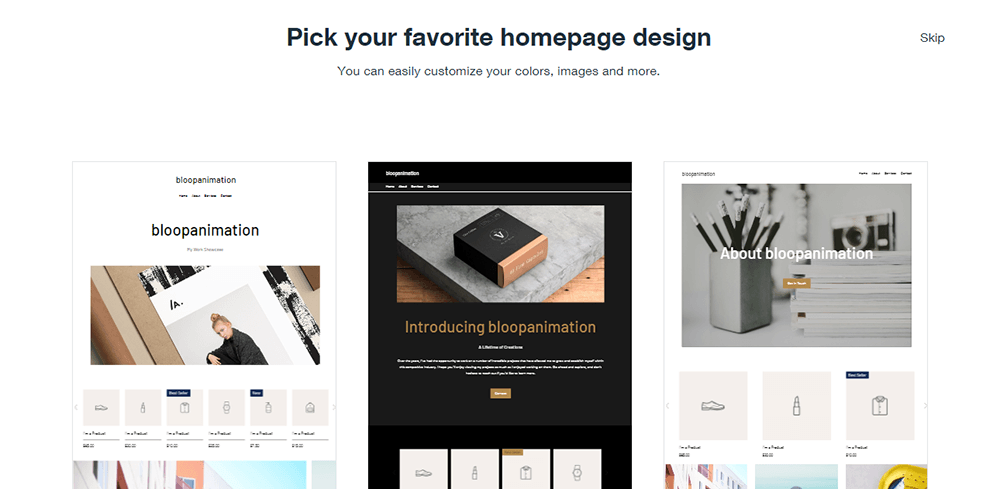
Select any of the displayed designs or skip. You can still change them later. Once you’ve selected a design, you’ll be taken to the Wix ADI Editor.
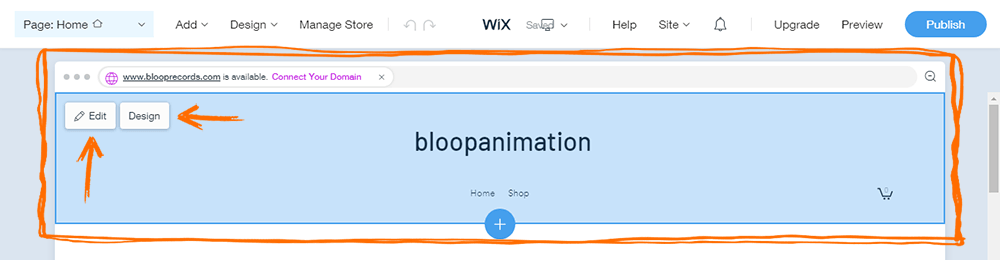
The Wix Editor has three main areas, which are identified in the image below as; (1) Top Menu Area (2) the Sidebar Area, and (3) the Main Page Area.
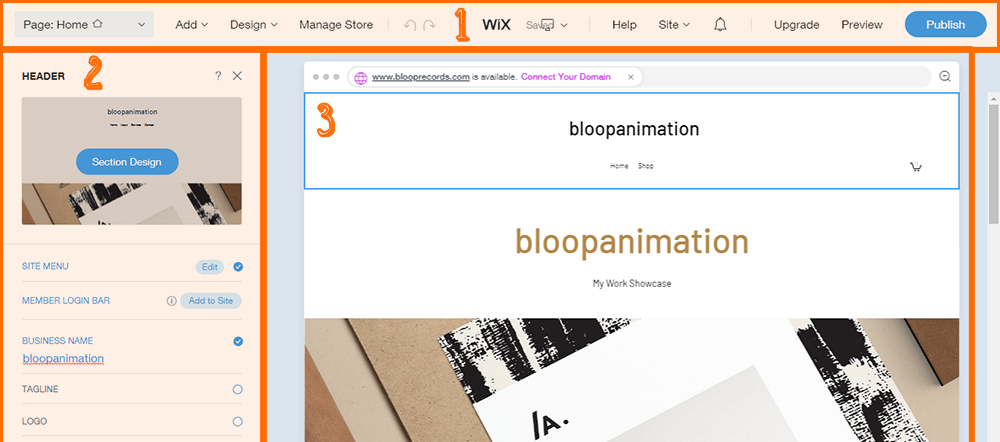
It’s important that we take a deep look into each of these areas and how they function.
Main Menu Area: The main menu area comprises of the following tabs:
![]()
- A) Active Page Selector: This is where you’ll select a page you want to appear on the main page area for editing.
- B) Add: This is used to add a new page or a new page section.
- C) Design: This area lets you change themes, colors, fonts, animations, or page designs.
- D) Manage Store: This is used for setting up an online store. Since our interest is in creating a portfolio, we will skip this.
- E) Undo/Redo buttons: Undo or redo an action.
- F) Help: Access the Wix help database.
- G) Site: This tab contains a list of sub-menus like “create a new site”, “my site”, “connect domain”, etc. Our only interest here is the “connect domain”; others are rather straightforward.
- H) Notification bell: All your notifications will appear here.
- I) Upgrade: To connect your domain, you will need to upgrade to a premium account. You can find all the upgrade plans here.
- J) Preview: The preview tab will enable you to preview your design before publishing it.
- K) Publish: Once you’re done designing the website and happy with what you saw in the preview, you can go ahead and hit the publish button to publish your portfolio website.
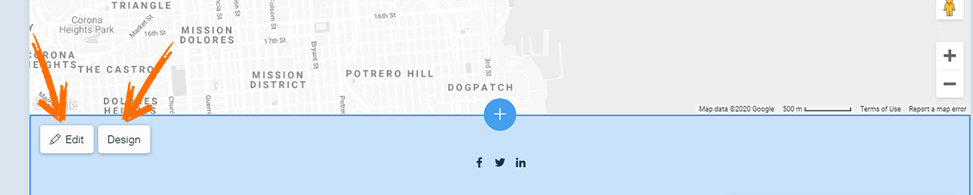
Sidebar Area: The sidebar area is usually used to display information that is not part of the main page. To begin, click on a section, and it will open for editing at the sidebar area. From there, you can change media files like images, edit text, and other things.
Below is a capture of the header section as it appears on the sidebar area.
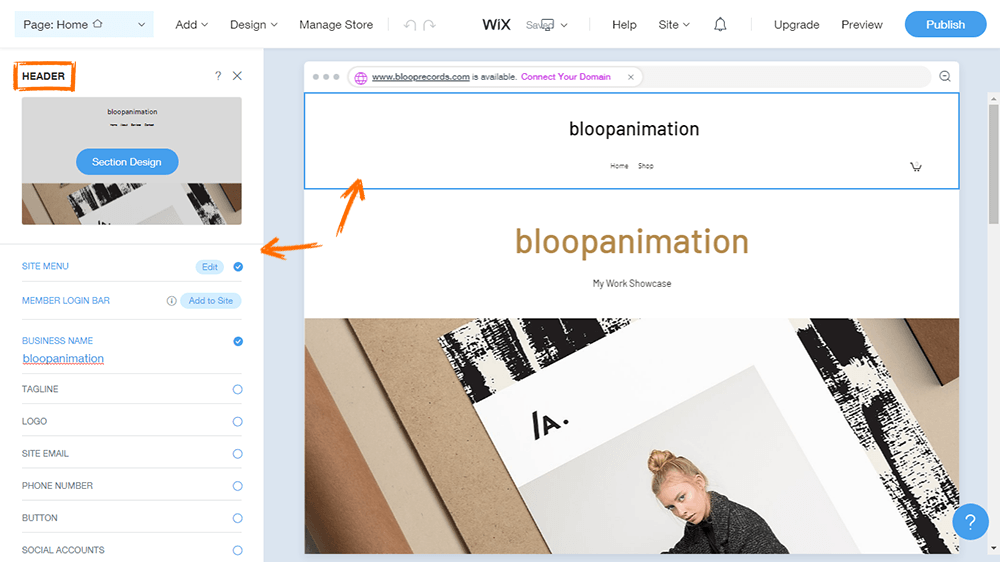
You can change the section design, add/edit menu, add a membership to your website, and much more from this area. To add any of those features to your website, just click on the check box next to it.
Let’s take a look at some of them:
- Site Menu: Each page you add to your website appears here. You can edit pages, rearrange page order or delete pages.
- Member Login Bar: This feature is for membership websites.
- Business Name: The business name you chose earlier is saved here. However, you can still change the name from here at any time.
- Tagline: Set a tagline for the website.
- Logo: Add a logo or change an existing one.
- Site Email: Edit or add a new email accounts.
- Phone Number: Edit or add a new phone number.
- Button: Enables you to add buttons such as the “Contact Us” or “Get in touch” buttons.
- Social accounts: Edit or add your social accounts.
The options above are included with the header section. Other sections have their respective features. Click on any other section, and the editing features will appear at the sidebar.
Main Page Area: This is the main viewing area where you can see your design. The viewer is incredibly intuitive to use. Simply click on a section to edit, reorder/move, design, or delete it from your website.
You can have as many sections as you wish, but we recommend keeping it simple, with 5 or 6 sections. The header and footer sections cannot be moved/reordered but can be edited.
Body Sections: Unlike the header section, you can duplicate, move, delete the body section. You can also edit and design it. The two arrows at the top-right are used to move a section up/down. While the “move to…” option in the drop-down at top-left is used to move a section to a particular area.
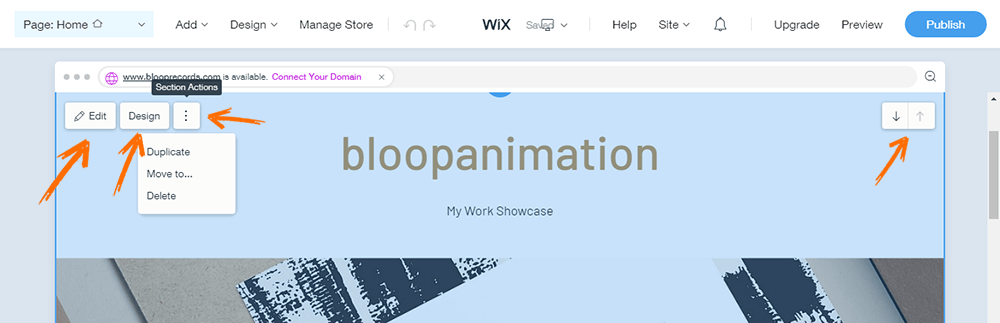
The Footer/Header Sections: Like I mentioned before now, you can only edit and design the footer section.
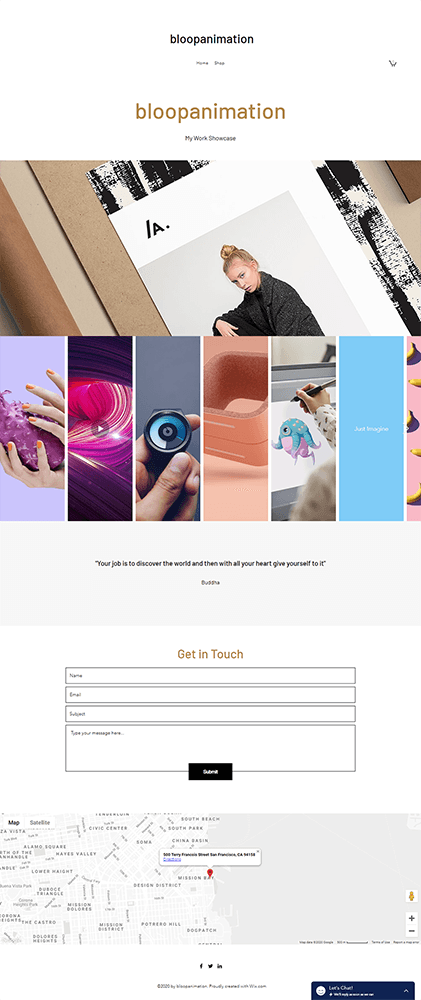
So let’s take a look at our final result. For this example we deleted all pages, leaving only the homepage. Our homepage has six sections.
- The header section
- Welcome section
- Pro gallery section (served as portfolio section)
- The quote section
- The contact section
- The footer section
Using Wix’s website Editor to create a portfolio website
Now that we’ve seen how the Wix’s ADI works, lets take a look at how to customize our portfolio website by using the Wix Editor. To use Wix website Editor, go to Wix and follow all the steps as stated previously. This time, select the “choose a template” option.
On the next page, you’ll see lots of beautiful templates spanned into multiple pages. Browse through and make a choice.
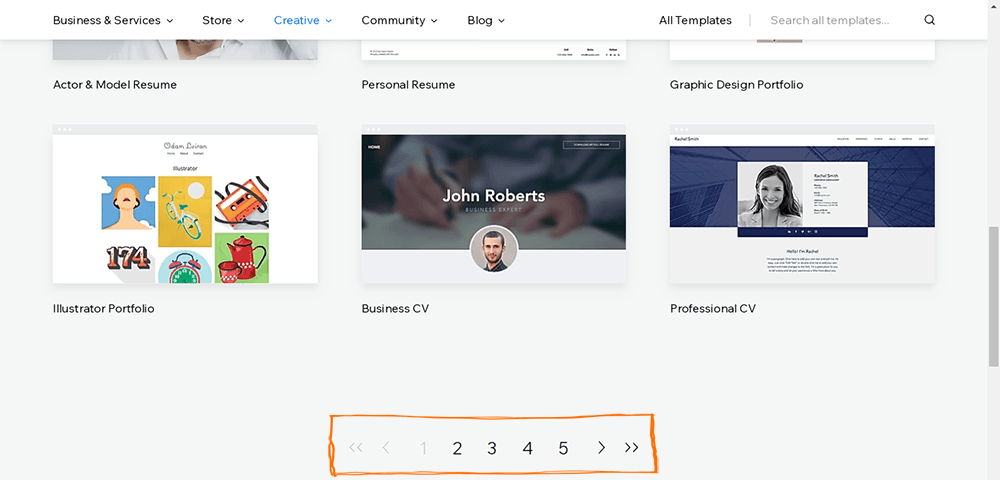
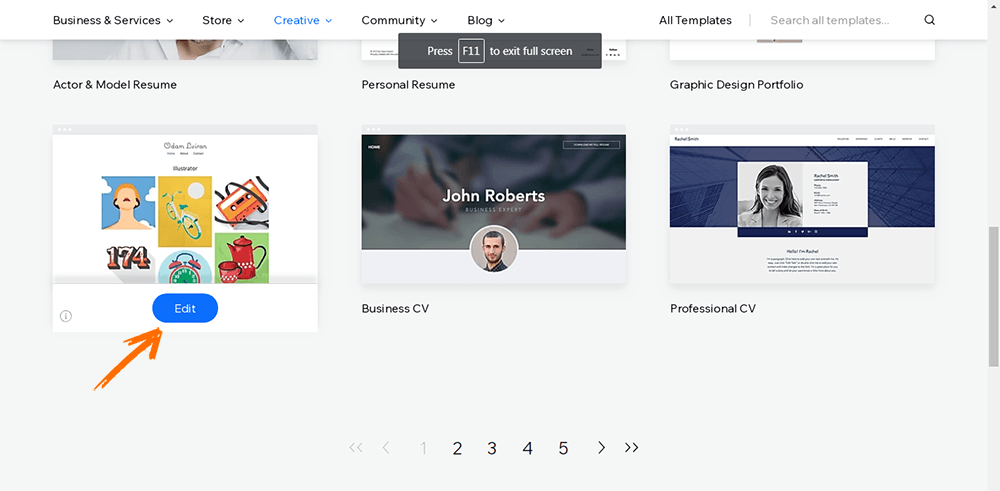
Hover over the template you want to use and click on “view” to preview the template, or “edit” to start working with the template immediately.
Once you click the “edit” button, it will take you to the Wix website editor. The editor is quite simple and easy to use; let’s take a look at a few of the features.
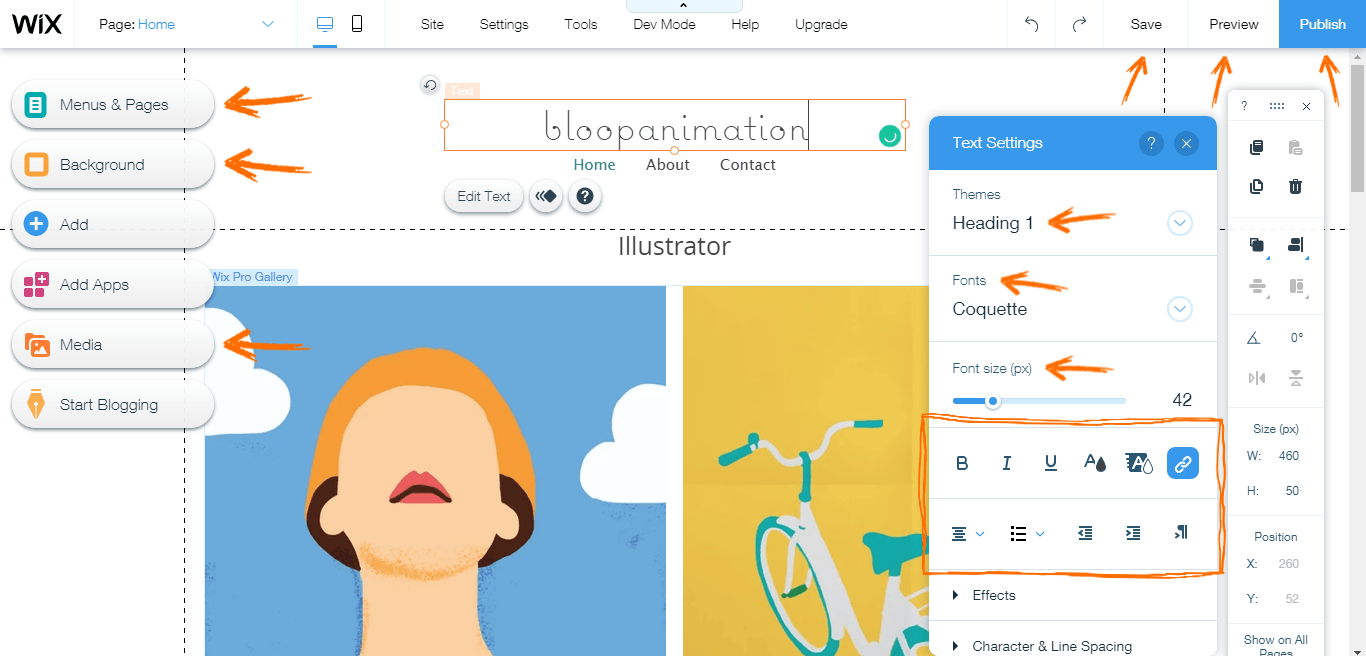
In the image below we double clicked on the title to make editable, so you can easily type your website’s title. You can change the heading type, the font face, the font size, font color, and other text formatting options using the “text settings” box. The “text setting” box only appears when you want to edit a text.
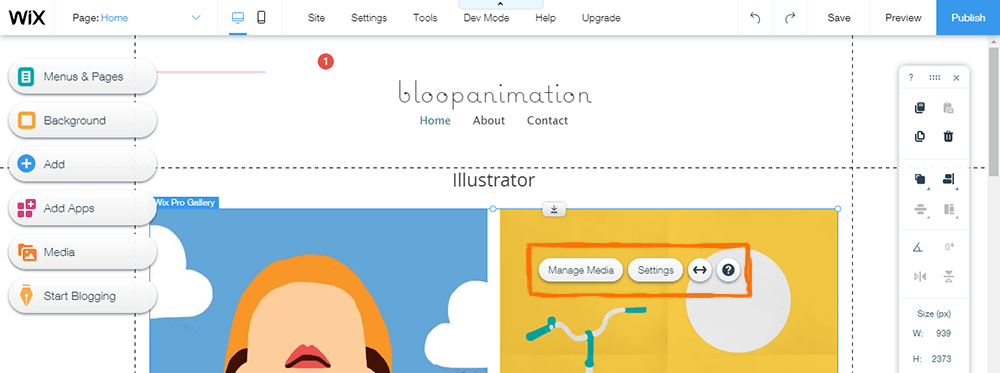
You can edit the menu and pages, add a background, and add media to your website. You can click on elements in the canvas to edit them.
You can save or preview your website before publishing it. When you’re ready to publish, click on the “publish” button on the top-right. We recommend saving your work from time to time to avoid losing your design.
If this is your first time dabbling with website design you may find it confusing. But Wix’s editor is so simple to use, that after playing around with it for a bit you’ll get the hang of it and feel comfortable navigating it.
Here’s our final result:
Connecting a custom domain to your Wix Site
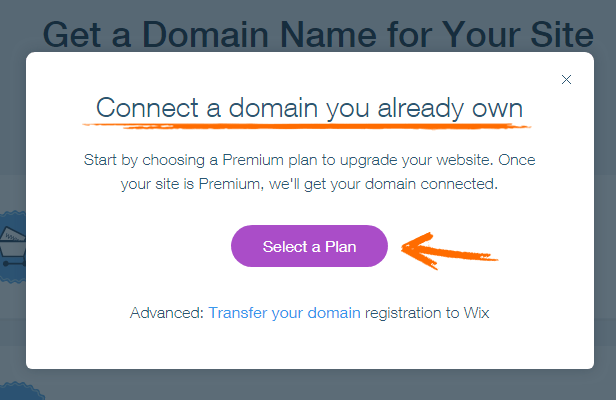
You can connect a custom domain to your Wix site from different places on your site dashboard. To connect your domain, go to your account at the top-right of the page. A pop-up will appear with a call-to-action “Get a Domain.”
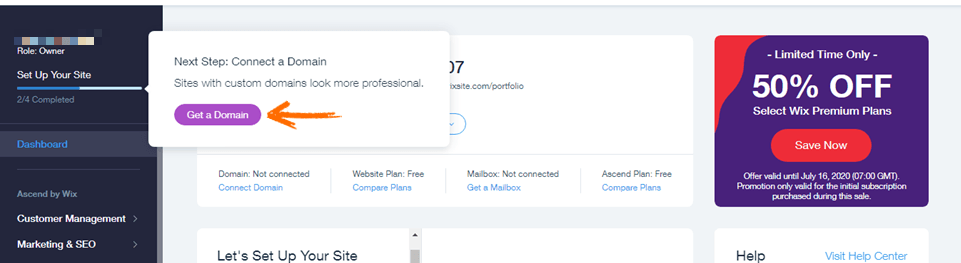
You can also do this by visiting your profile drop-down or just click on “Get a domain” right there on your dashboard.
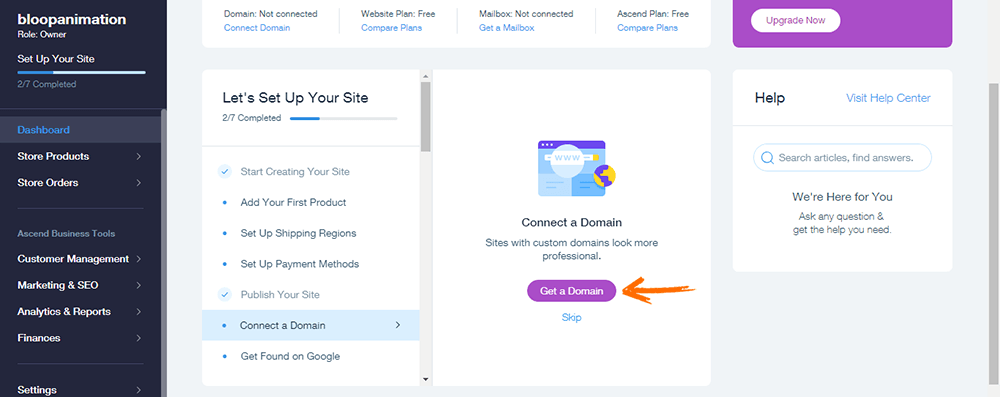
After that, you’ll be presented with an option to buy a new domain or connect a domain you already own.
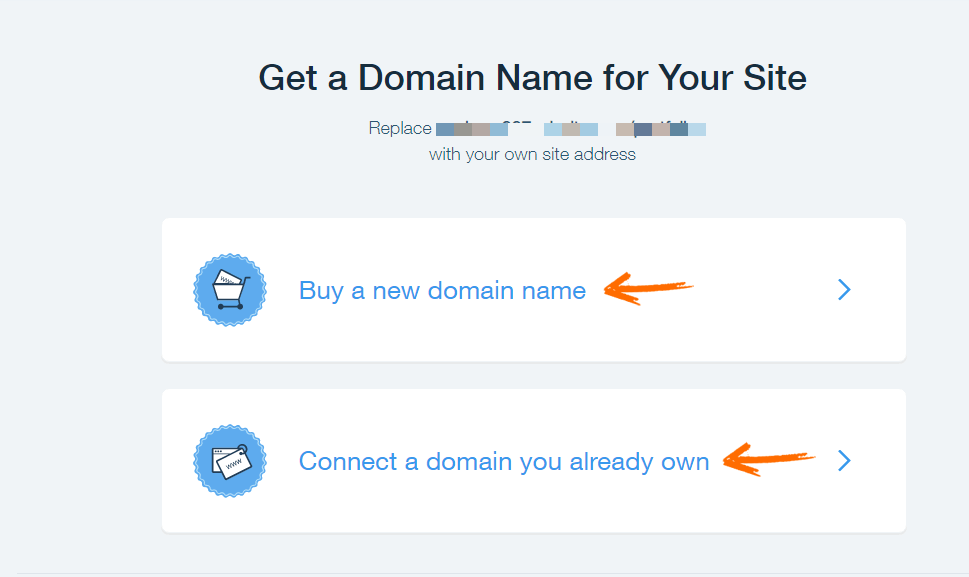
To connect a domain you already own, you must upgrade to a Wix premium plan. Go ahead and upgrade your plan if you wish to connect your already purchased domain.
If you don’t have a domain and wish to buy a new one, then click on “buy a new domain.”
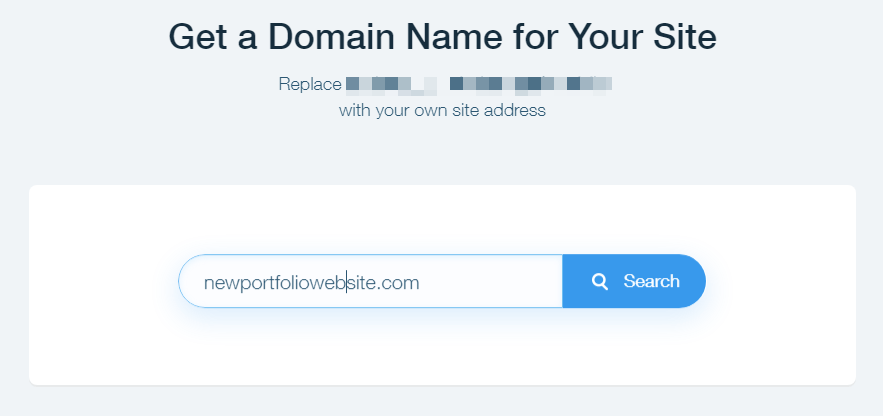
Type the new domain you want to buy and click the “search” button to check If the domain is available.
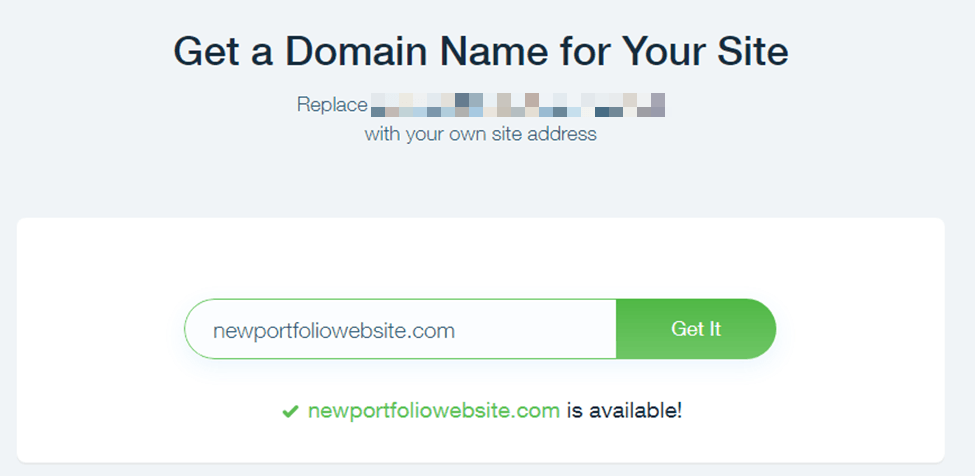
Click on “Get it.” You’ll either upgrade to a yearly plan that includes a 1-year free domain, or buy the domain and upgrade later.
Note: the domain will not be assigned to your website until you upgrade.
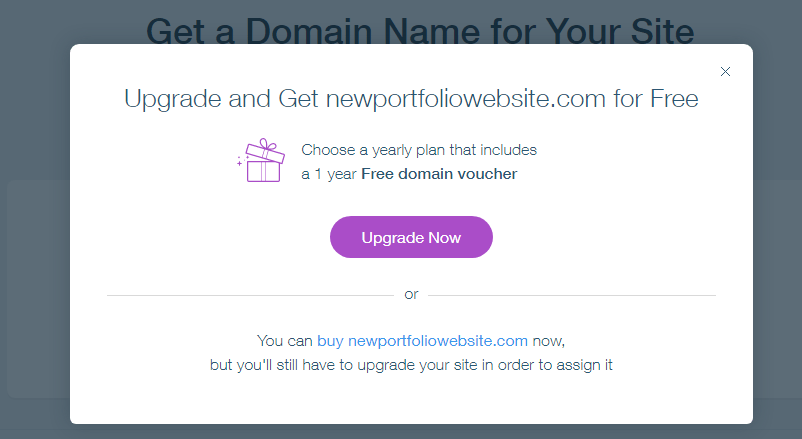
Select a plan to move on to payment.
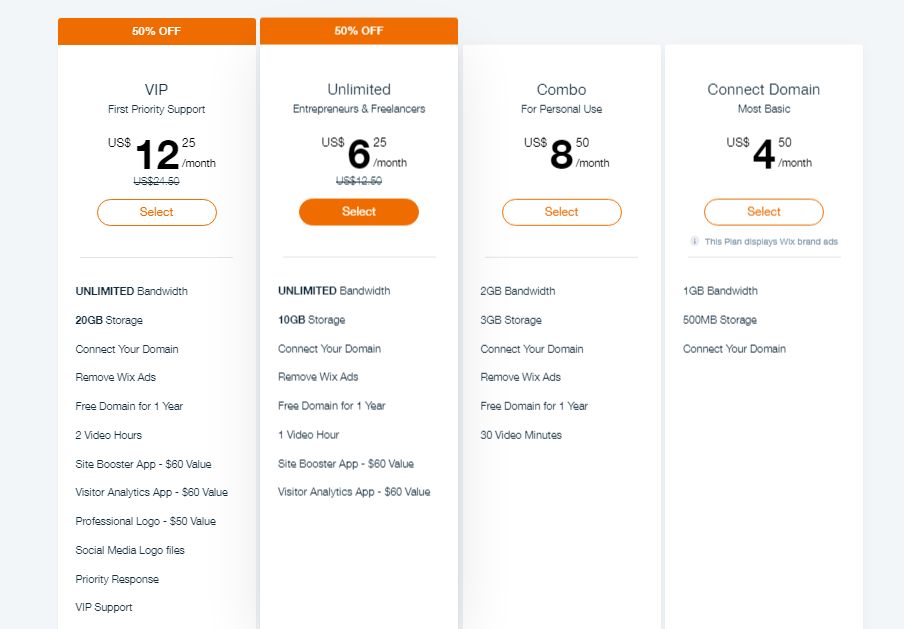
We recommend the yearly plan so you can get a free domain voucher and other great features.

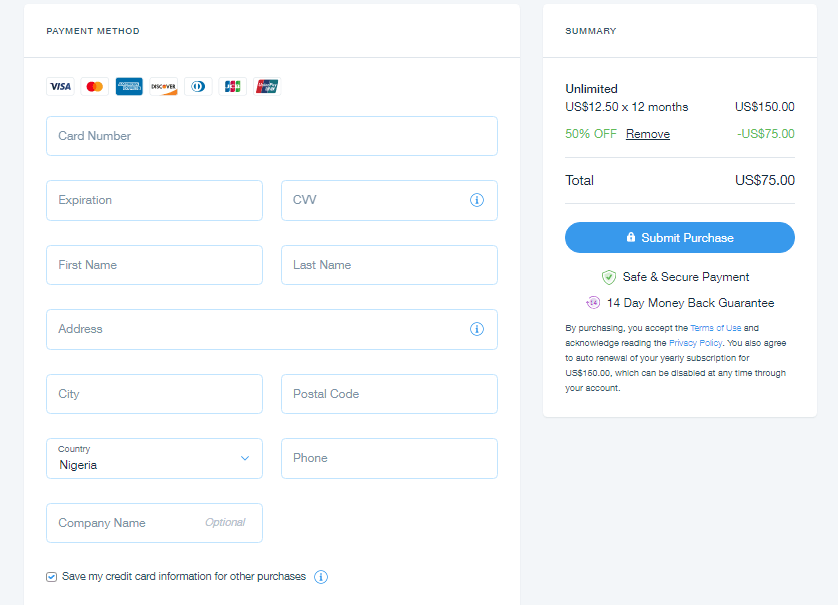
Enter your card details and submit your purchase.
Congratulations! your premium plan is up and you’re all set to build your portfolio website!
How to get your portfolio website online using Bluehost web hosting
If you you plan to use WordPress (the most popular Content Management System) to design your portfolio website, then using Bluehost for hosting your site is the best option for beginners.
In this section we’ll take you through the entire process of setting up a hosting account on Bluehost, register a domain, install and activate WordPress on it.
Why Bluehost?
Bluehost is one of the most popular, reliable, and trusted hosting companies in the world. We’ve used Bluehost to host Bloop Animation in its first few years (before switching to Kinsta, which is a more heavy duty hosting service aimed at websites with heavy traffic and e-commerce needs) and it’s been the quickest most affordable option for many others like us.
How to create an account on Bluehost and install WordPress
1. Getting started
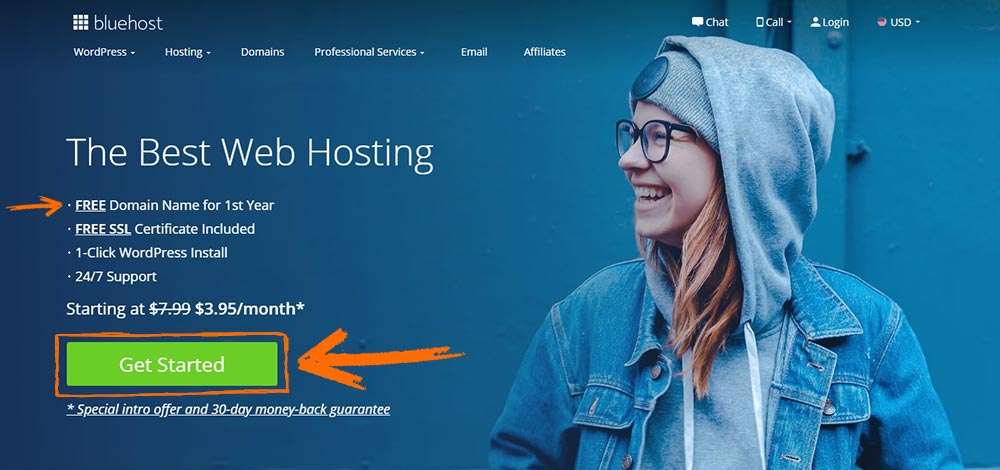
To create an account on Bluehost, visit www.bluehost.com and click on the “Get Started Now” button.
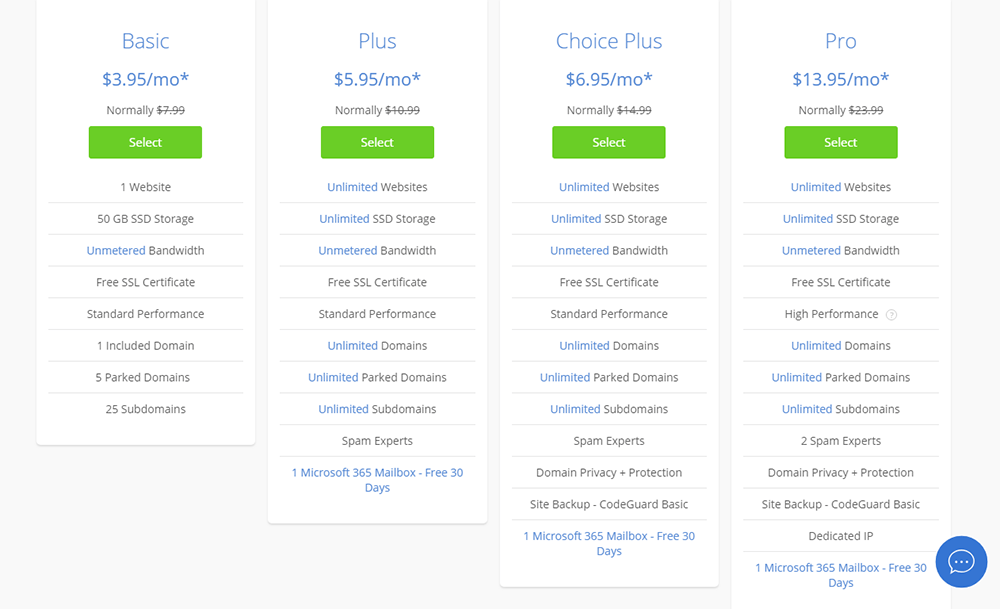
2. Select a hosting plan
The purpose of your project determines the best hosting plan for you. If you are creating a portfolio website, you should probably go for the basic plan.
The good thing about Bluehost is that when your website starts getting a lot of traffic, you can always upgrade to a higher plan without any effect on your website. Bearing that in mind, we will be signing up with the basic plan for our portfolio website.
With shared hosting, which is widely used and affordable, we can easily install and activate our WordPress website. Unlike in Virtual Private Server (VPS) hosting, server management, and platform patches are handled by hosting providers of shared hosting. So, we don’t need to worry about all those.
Let’s look at the Bluehost shared hosting plans and their features.
3. Register a domain name
At the beginning of this guide, we went over choosing a domain name. Now that we have chosen a hosting plan, we can finally register that domain name.
Thankfully, Bluehost gives you a free domain for the first year when purchasing a hosting plan.
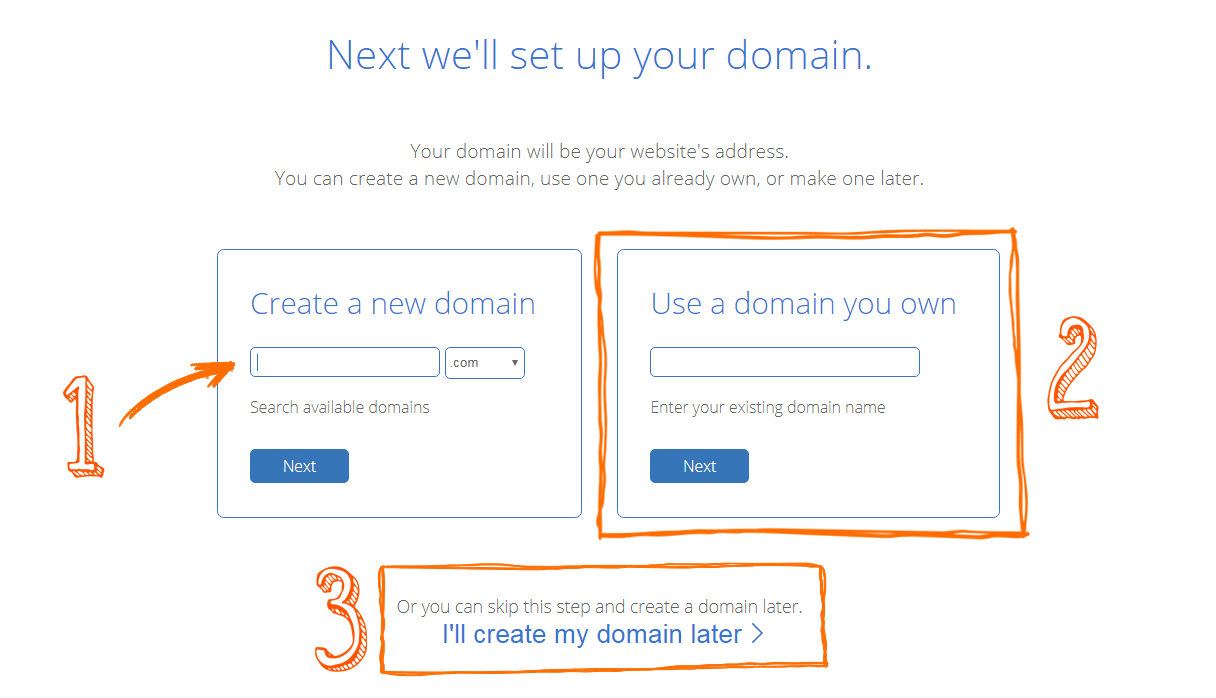
We have three options to choose from.
- Create a new domain
- Use a domain you already own. If you choose this option, you’ll have to point the domain nameservers to Bluehost hosting. Click here to learn more about setting up nameservers.
- Skip and create a domain name later.
For the purpose of this guide, we’ll go with the first option.
4. Create your account
Once you click “Next” after providing your domain name, you’ll be taken to the next page where you’ll either create a new account or login if you already have an account with Bluehost.

Fill out the account information and proceed to the next step.
5. Choose Package information and extras.
Choose your account plan depending on your budget; you can go for 12 months or more. You’ll notice that the longer the plan is, the cheaper the monthly price will be.
Basic 12 Months Price – $5.95/month – $71.40/year
Basic 24 Months Price – $4.95/month – $118.80/year
Basic 36 Months Price – $3.95/month – $142.20/year
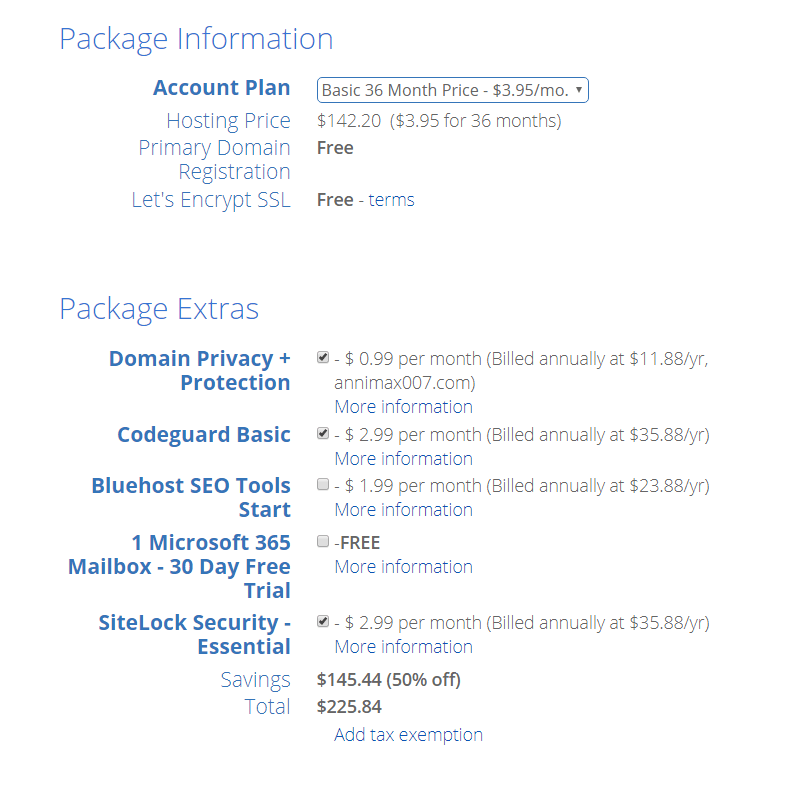
You can choose any of the following extra packages:
- Domain Privacy Protection: Costs $0.99 more per month (billed annually at $11.88/year). Domain privacy will protect your personal information (e.g., your name, email, country, and address) from the public view. This is recommended only if you want your domain information anonymous.
- SiteLock Security: Costs $1.99 per month (billed annually at $23.88/year). This add-on verifies your email address, physical address, and phone number. This feature is needed if you intend to prove your credibility to your customers.
- CodeGuard Basic: Costs $2.99 per month (billed to the end of hosting term). This provides extra security by letting you backup your website regularly.
- Bluehost SEO Tools Start: Costs an additional $1.99 per month (billed annually at $23.88/year). Bluehost’s SEO tool that can help your website’s rankings on search engines.
- 1 Office 365 Mailbox: Comes free for the first 30 days. It is an email platform powered by Microsoft.
I recommend adding the Domain Privacy package. The rest are a bit of an overkill for portfolio websites in my opinion.
Next we’ll add our payment information and submit. If you don’t want to pay with a credit card, you can click on “more payment options” to pay with PayPal.
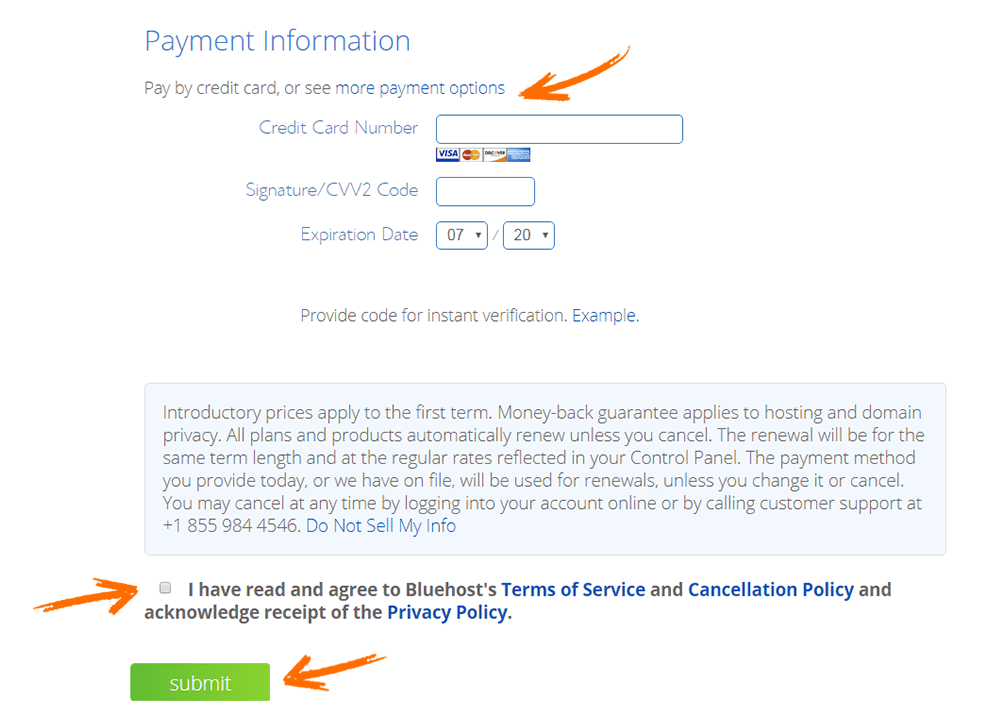
Once you’ve entered all information correctly and clicked “submit“, you’ll receive a confirmation email and a congratulatory message. You have signed up to Bluehost successfully! Click the “Create Account” button to continue.
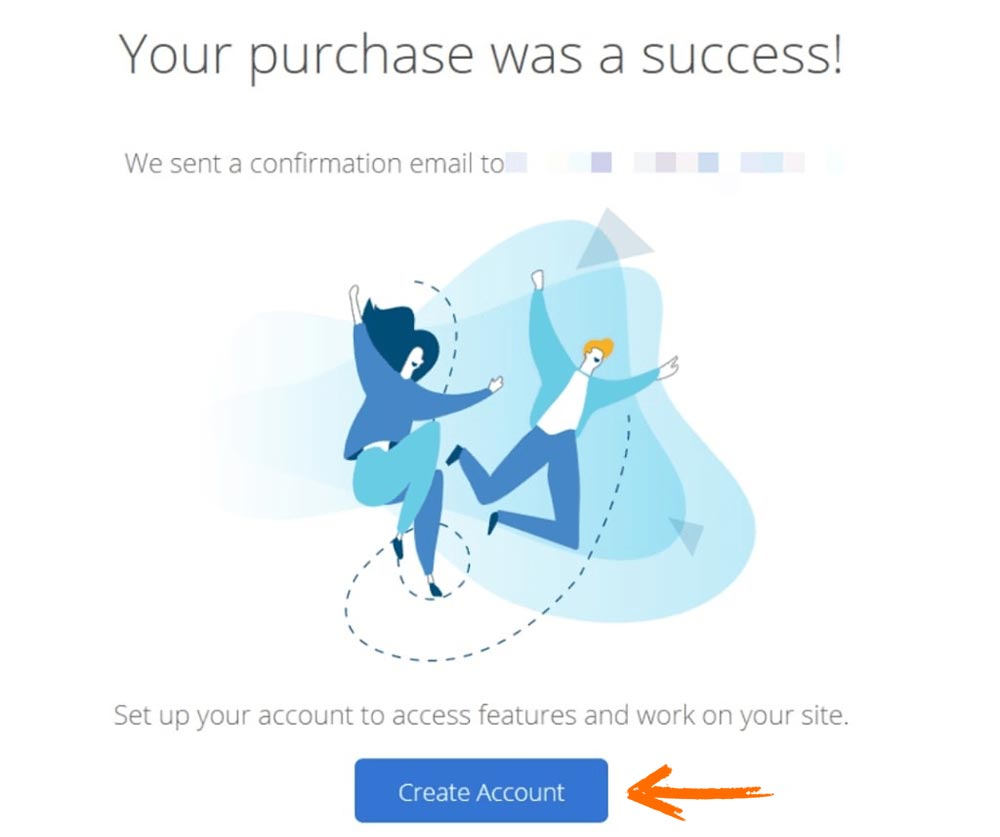
Bluehost usually creates a site for you automatically after registration. However, you can delete this site by going to “Manage Site,” click on “Settings,” then scroll down to the bottom of the page and delete it.
- WordPress installation using Bluehost’s “One-click Installation” button
After signing up on Bluehost, the next thing to do is to install and activate WordPress. With Bluehost’s “One-click Installation” for WordPress, you can seamlessly install WordPress in one click and in no time.
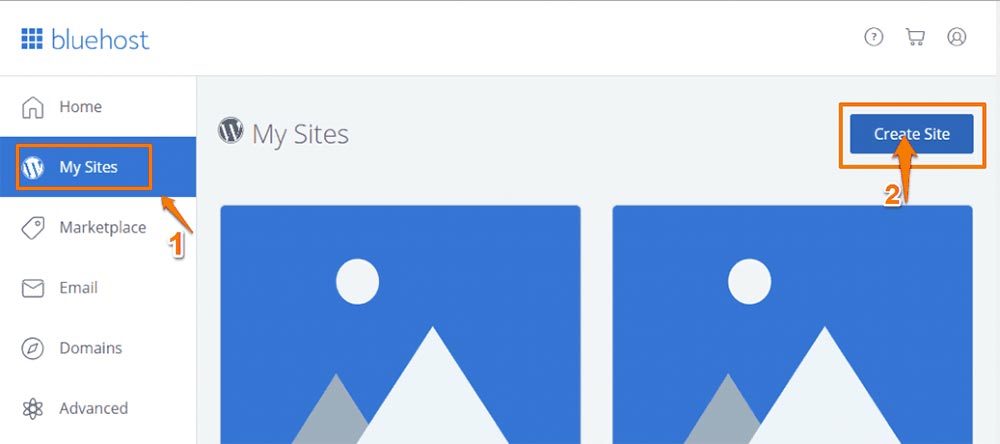
a) Log into your Bluehost account. From your dashboard, click on “My Sites”, and then on “Create Site.”
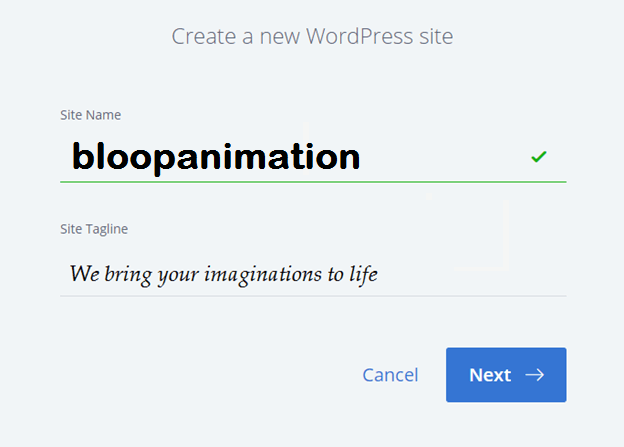
b) Enter a name and site tagline for your new WordPress site and click on “Next”.
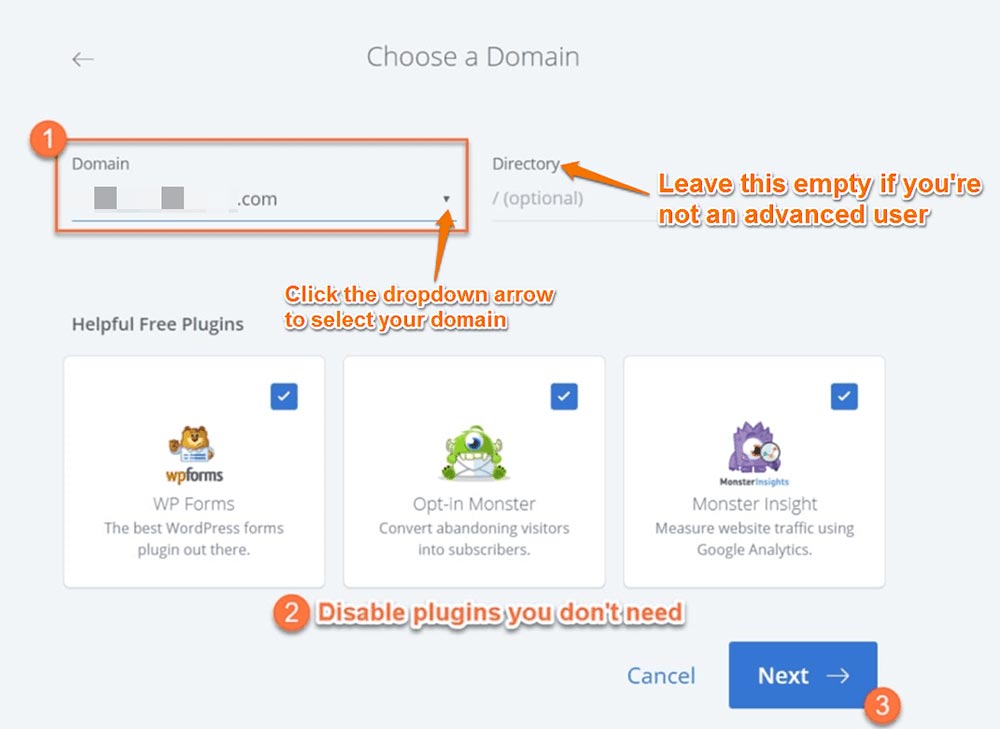
c) If you registered a domain, from the dropdown arrow, choose a domain you want to use for your portfolio website. Be sure to uncheck the boxes for the plugins you don’t need.
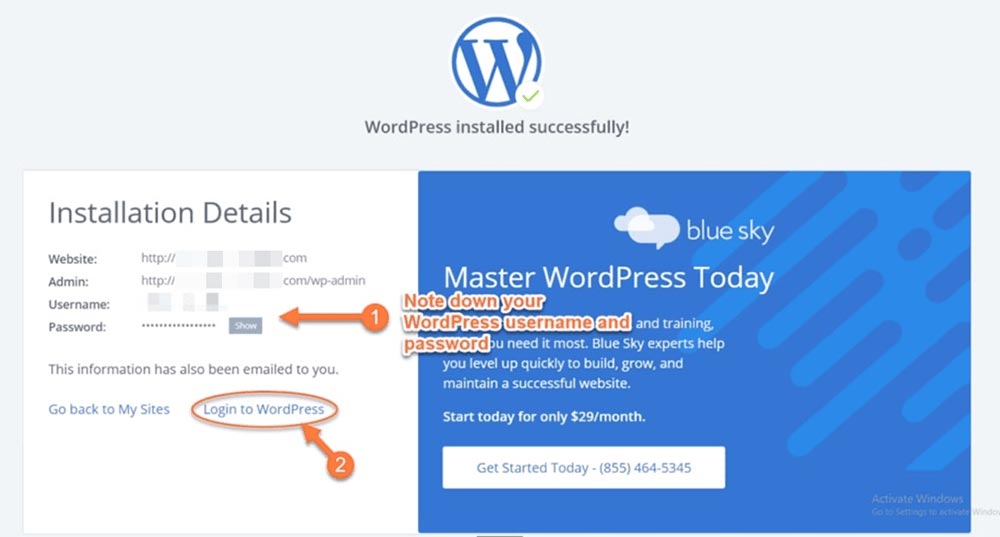
Write down your WordPress Username and Password, and click on the “login to WordPress” link to continue.
Now that we are done with the WordPress installation, we need to get a template to design the actual look of the website. We’ll cover that extensively in step 3.
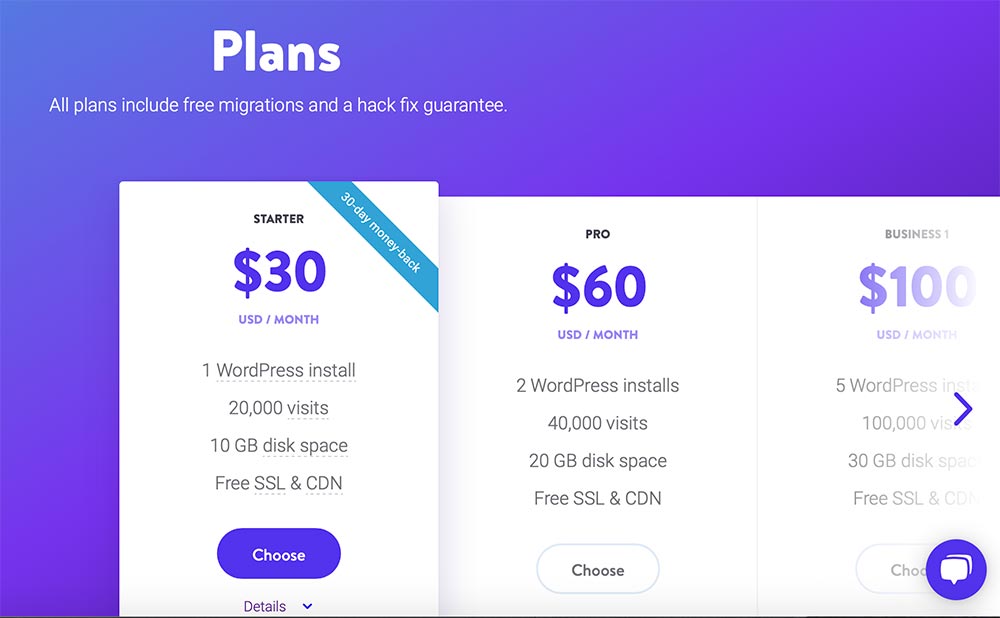
How to get your portfolio website online using Kinsta
Kinsta is a premium WordPress hosting service. It is the fastest, safest one we’ve found, and has superb customer service. I simply can’t recommend them enough.
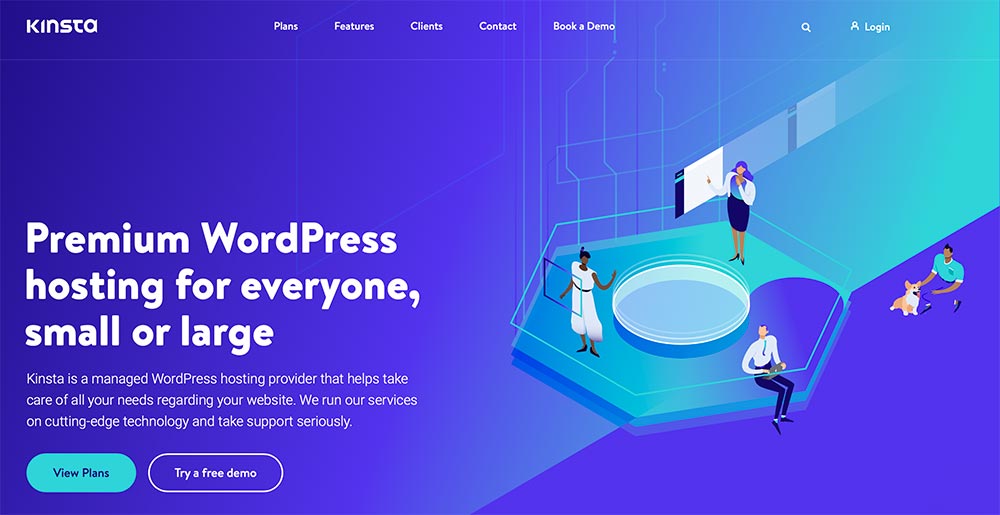
They aren’t cheap, with the cheapest plan starting at $30/month, but they are more than worth it.
All plans come with a free WordPress migration, which means Kinsta will transfer your entire website for you from your previous hosting service, and set it all up for you.
Their plans also come with a free CDN, automatic daily backups, 24/7 excellent support, and a free SSL certificate. Most hosting services charge for these type of add-ons.
After picking a plan, simply go through the checkout process, and the kind people at Kinsta will guide you through the rest of the process.
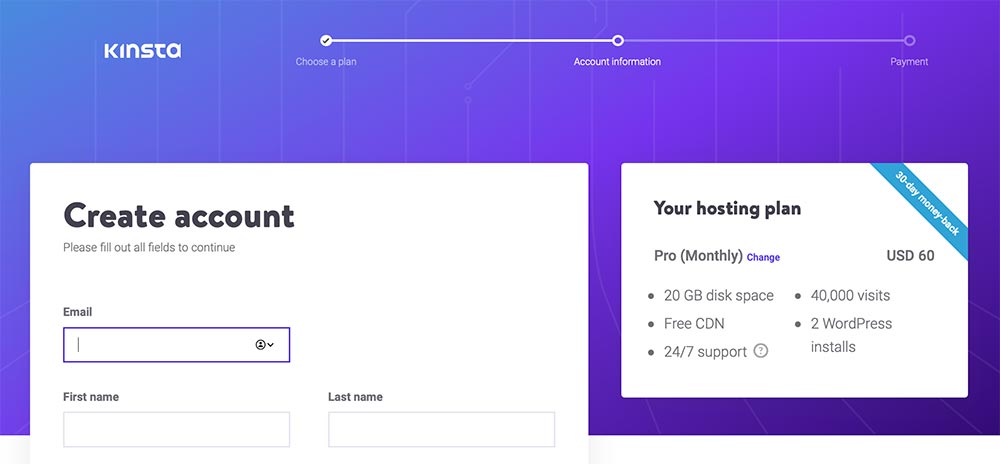
Once your WordPress website is set up, the rest of the process of designing your website is the same as any other hosting service, and we will cover that in step 3.
Step 3: Design your portfolio website on WordPress using a theme (free / paid)
In this part we’ll be working in WordPress to show how to get and set up a new theme. We will start with the installation of a blank theme (which we actually covered in step 2), down to the installation of some free and premium themes.
If you are hosting your WordPress website on Bluehost or other hosting providers, you have the freedom of using any theme (both free and paid) for your website. We recommend staying away from nulled or cracked themes to avoid installing malicious files into your website, thereby making it vulnerable for hacking.
X Theme – our most recommended premium theme
Before we cover some recommended free and paid themes, we want to show you how to set up what we consider to be one of the best themes out there – X. It is the theme we use at Bloop Animation, and my go-to x theme whenever I set up a website.
X is made by themco. hey make 2 versions of the theme: X, and Pro. Pro is just a more customizable version of X. For most people I’d recommend sticking with X.
To get X, thought, we’ll have to go to Themeforest.
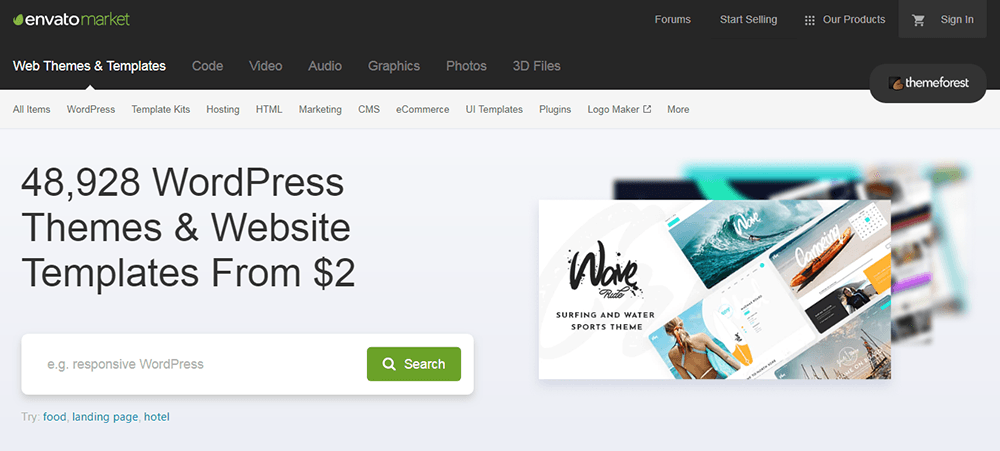
Getting premium WordPress themes from Themeforest
There are so many trusted premium theme websites, but we recommend Themeforest. Themeforest is the number 1 premium theme vendor, and they have a theme for pretty much any purpose, including portfolio websites.
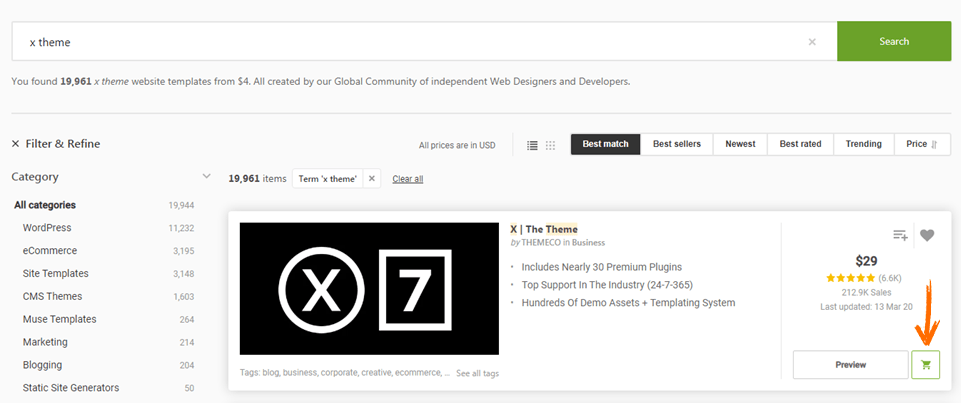
So lets go to themeforest.net. In the search box, type “x theme” and click Search.
The first result should be the theme we’re looking for. Click on the shopping cart icon to add it to the cart.
A pop-up will appear with options to choose between Regular and Extended License, and between 6 and 12 months support. For this project, we are going with the regular licenses with a 12-month support plan, which costs $35.38 in total.
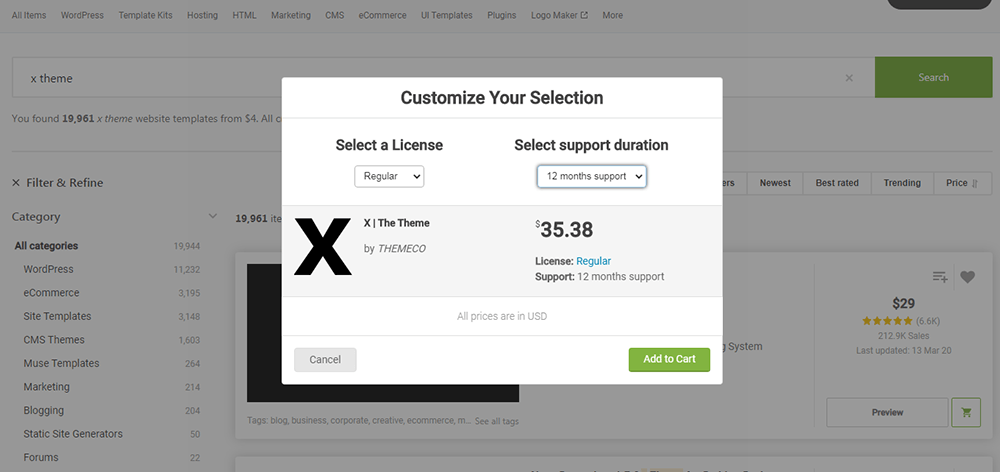
To continue, click Add to cart, and then on Go to checkout.
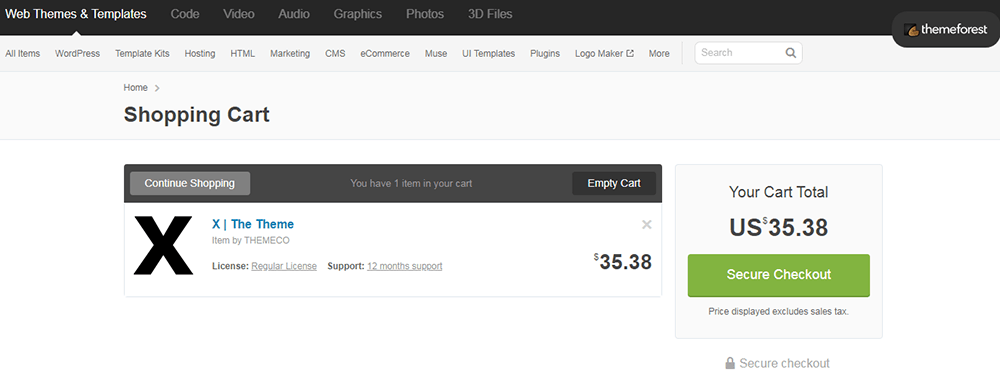
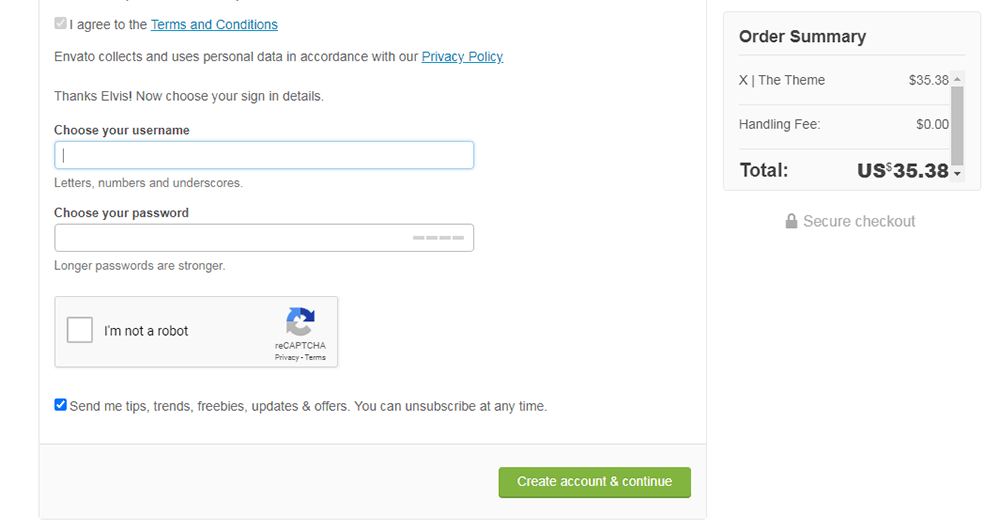
After clicking Secure Checkout, you’ll need to create an account or sign in to an existing account if you have one.
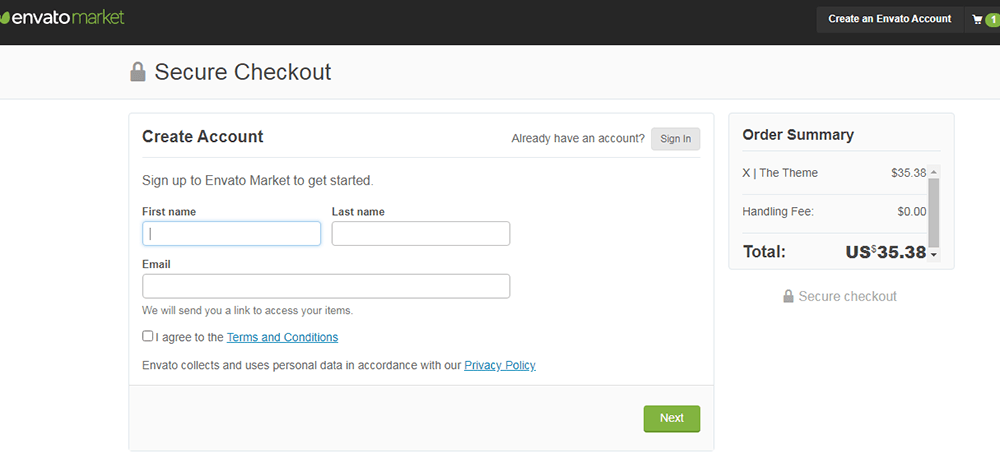
Choose a username and password to create an account and continue.
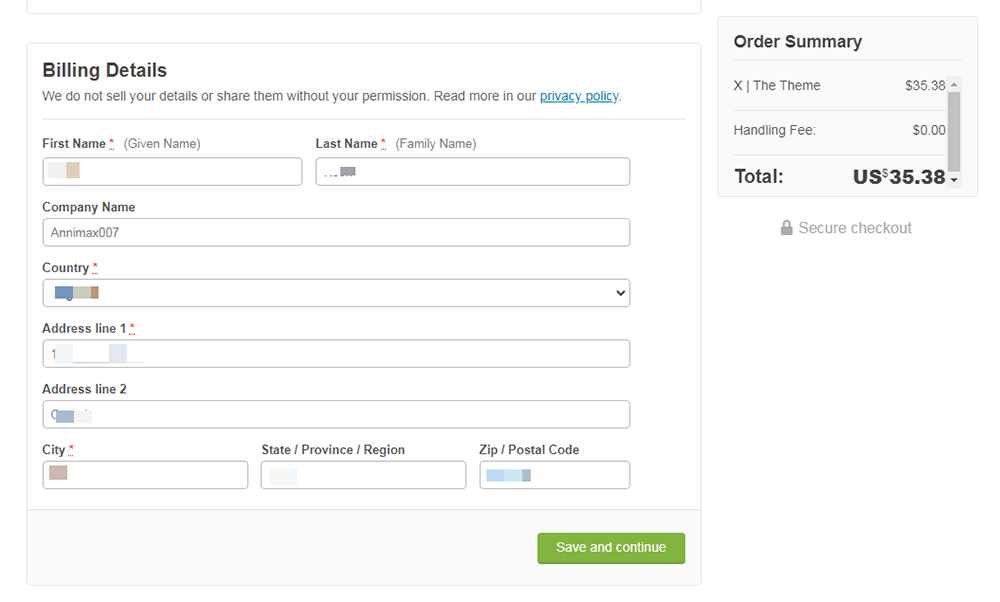
Next, fill in your billing details and click on save and continue.
Choose a payment option and complete the transaction. There is a credit card, Paypal, or Skrill option.
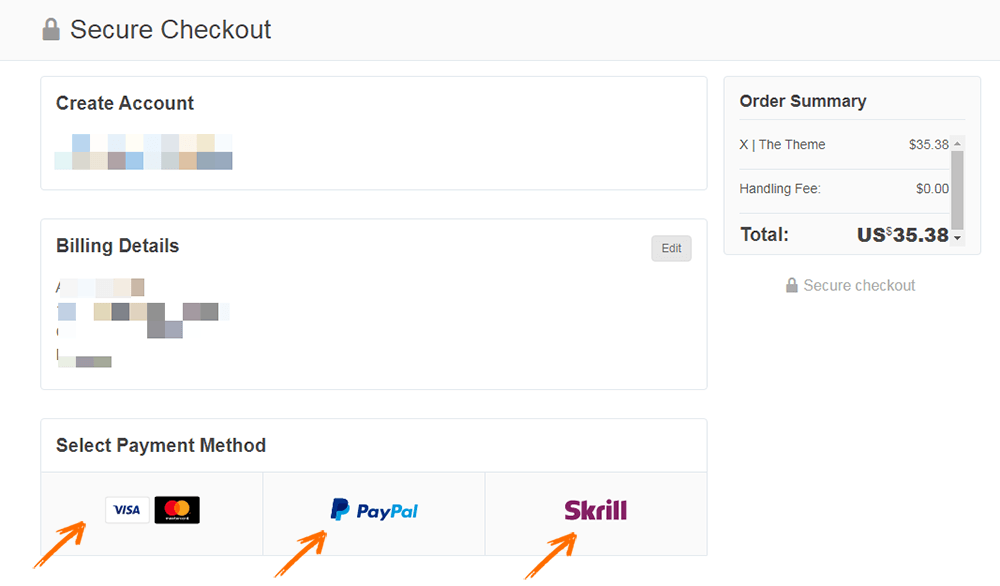
Once your payment is confirmed, you’ll receive a confirmation email from ThemeForest. The theme will be added to your ThemeForest account.
Accessing and downloading your themes after purchase
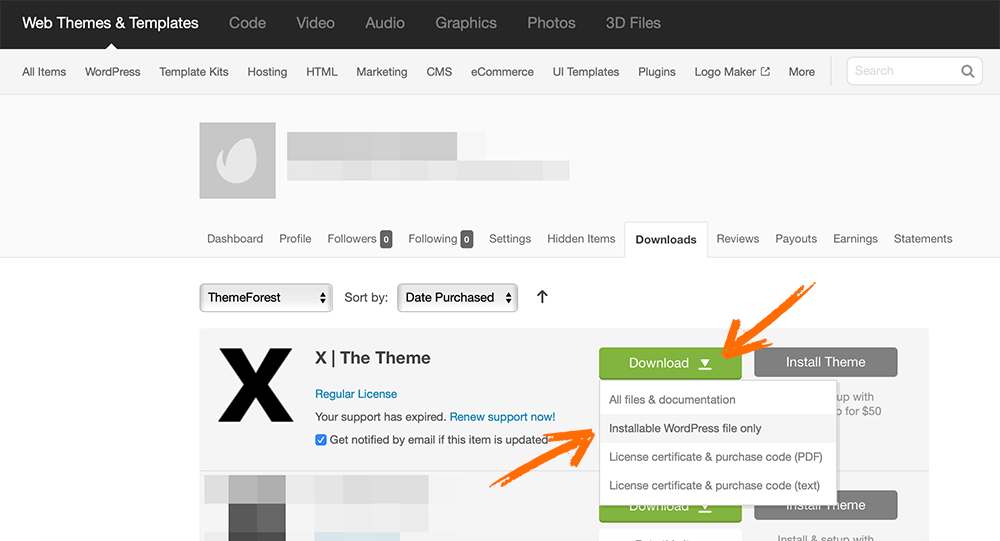
After you’ve purchased the X theme, you’ll need to download the theme file before installing it in your Bluehost hosting, where you’ve activated WordPress already.
To do this, log into your ThemeForest account, hover over your username at the top-right, and click on downloads.
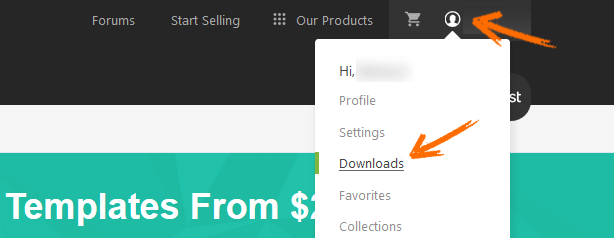
On the downloads page, you’ll see all the themes and items you purchased from ThemeForest. Click on the download button next to the x theme and then select Installable WordPress file only to download the theme. It will download the file in zip format.
Installing the theme
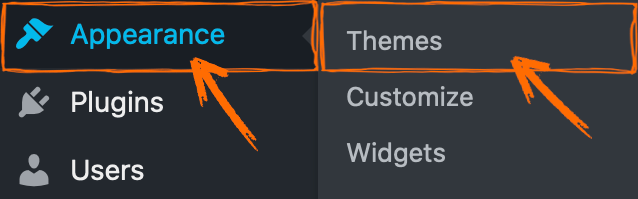
After downloading the theme files from your ThemeForest account, log in to your WordPress account you installed on Bluehost. Once logged-in, hover your mouse over to the “Appearance” section and select the “Themes” sub-menu.
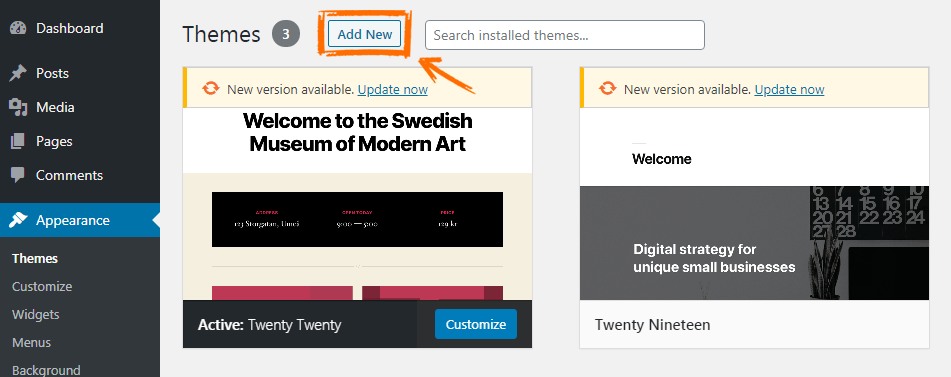
On the next page, click Add New.
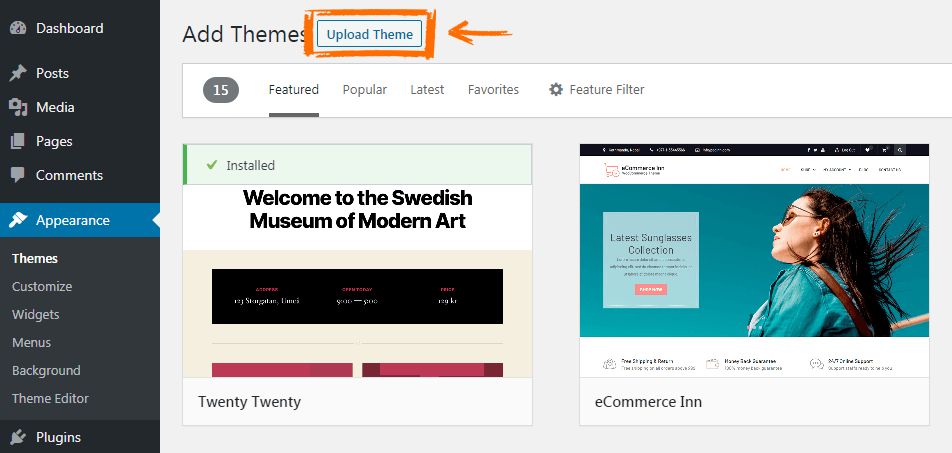
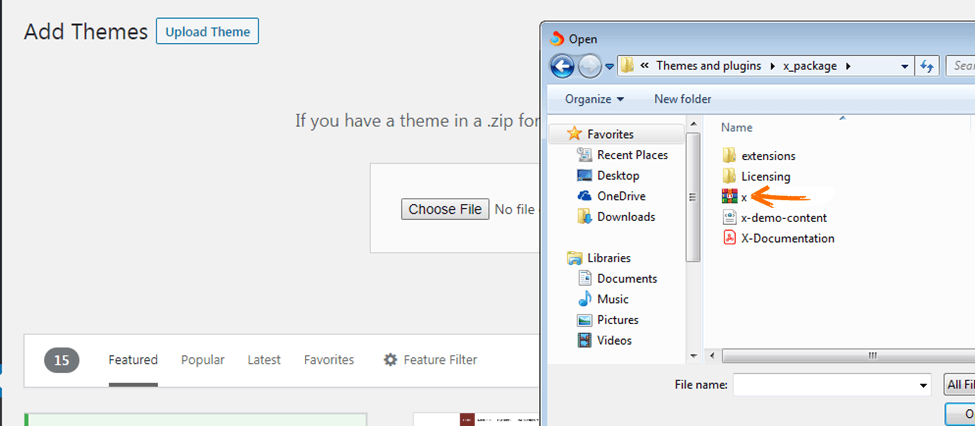
Then click Upload Theme.
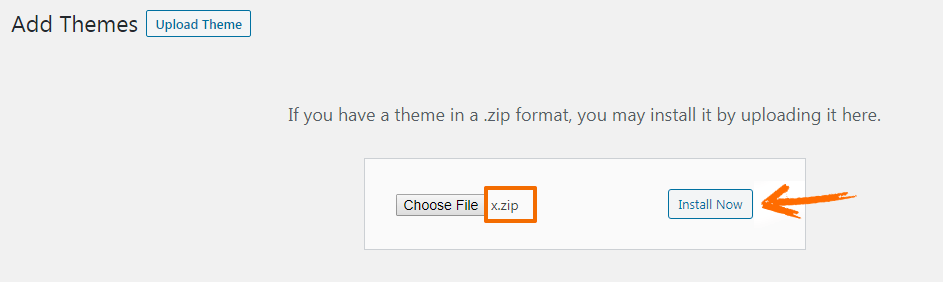
Install the theme file by selecting the Choose file option. Locate and select the zip file you just downloaded.
Click the Install Now button to install the theme.
It will take a few seconds or minutes to install, depending on your internet connection. Once the installation is successful, you will see a message like this:
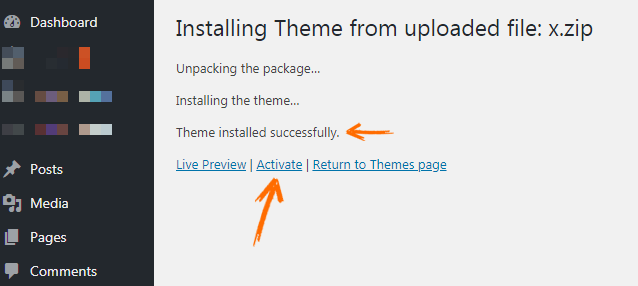
Click on activate to activate the theme. You will be redirected to the theme’s dashboard.
Validating Your Theme
To validate the “x theme”, submitting the license code that comes with your purchase for verification.
To get the purchase key from ThemeForest, follow these steps:
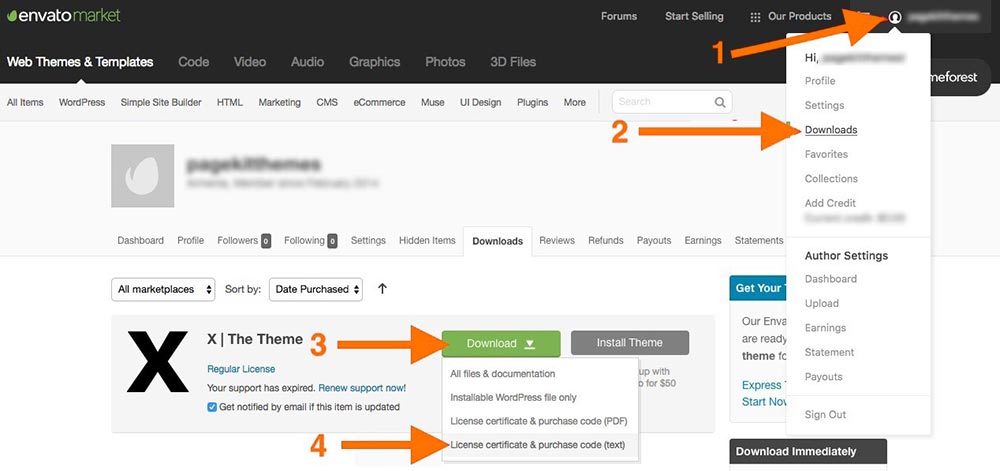
- Log into your account and click on your account name at the top-right section of the screen.
- From the dropdown menu, click on the “Downloads”.
- Click on the “Download” button next to the “x theme”.
- And then, click on “License certificate & purchase code” in the dropdown to download the product information text file.
Search for Item Purchase Code in the text file, and you will find the purchase key to use in product validation.
Now that you have your product license, head over to your WordPress installation, and access the product validation page as follows:
Go to X > Validation.
You will see an input field where you add the license number and hit enter:
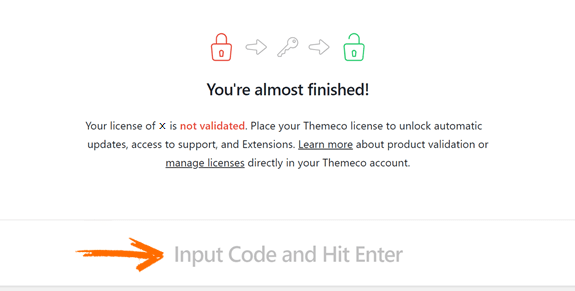
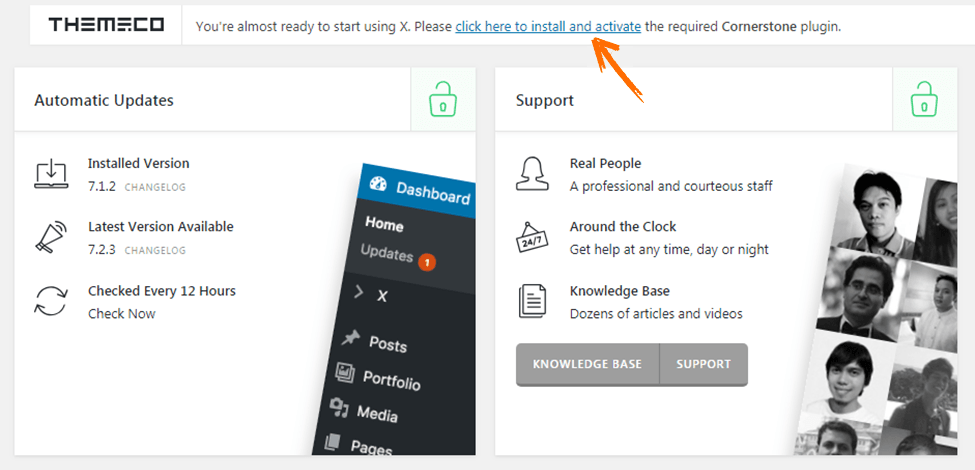
If everything goes right, you will get a success message. Now, install the required Cornerstone plugin.
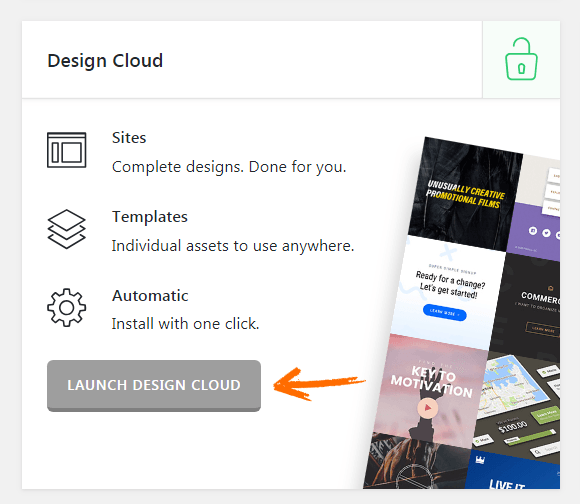
Click on X to go to the X theme, dashboard. Click on the Launch design cloud.
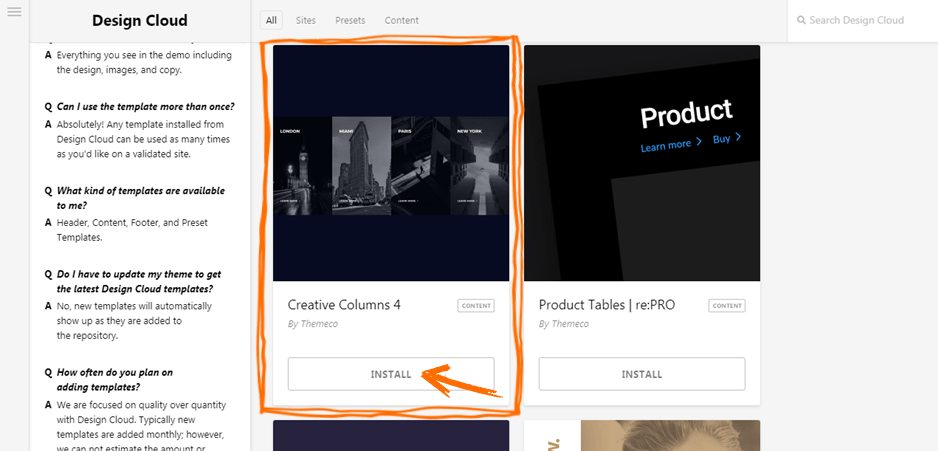
On the Design cloud, you’ll see many creative, beautiful themes. Choose the one you like and click on Install.
Visit your website to see what it looks like with the template you chose:
You can now go to the customizer to add your own images and customize the website to your liking. You can also change the theme if you don’t like it.
Recommended themes for your portfolio website (premium)
The X theme is by far one of the best ones out there, but it’s not the only one. There are plenty of other flexible great looking themes you can use, so let’s go back to Themeforest and check some of them out.
With well over 48,600 themes in their listings, finding the perfect theme for a project on Themeforest can be difficult daunting to the uninformed.
Luckily for you, we have done the research for you and found 10 great options for a portfolio website.
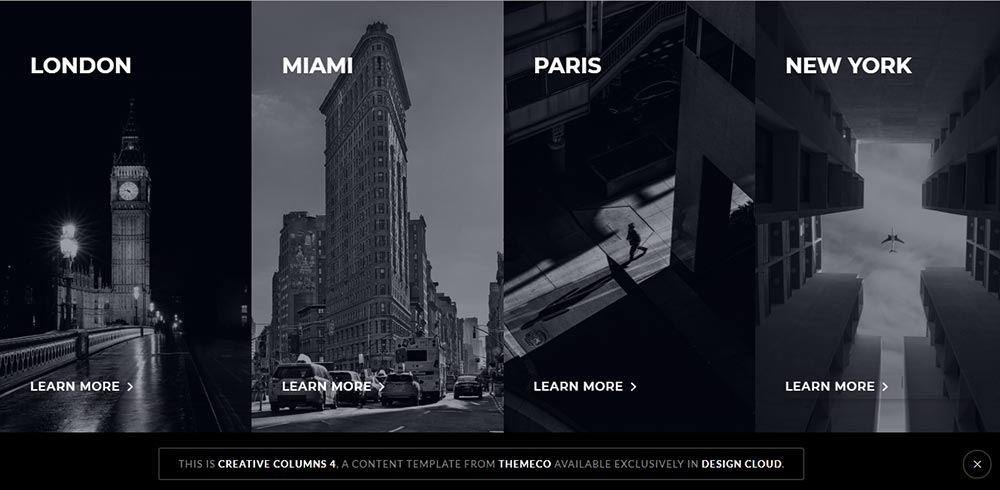
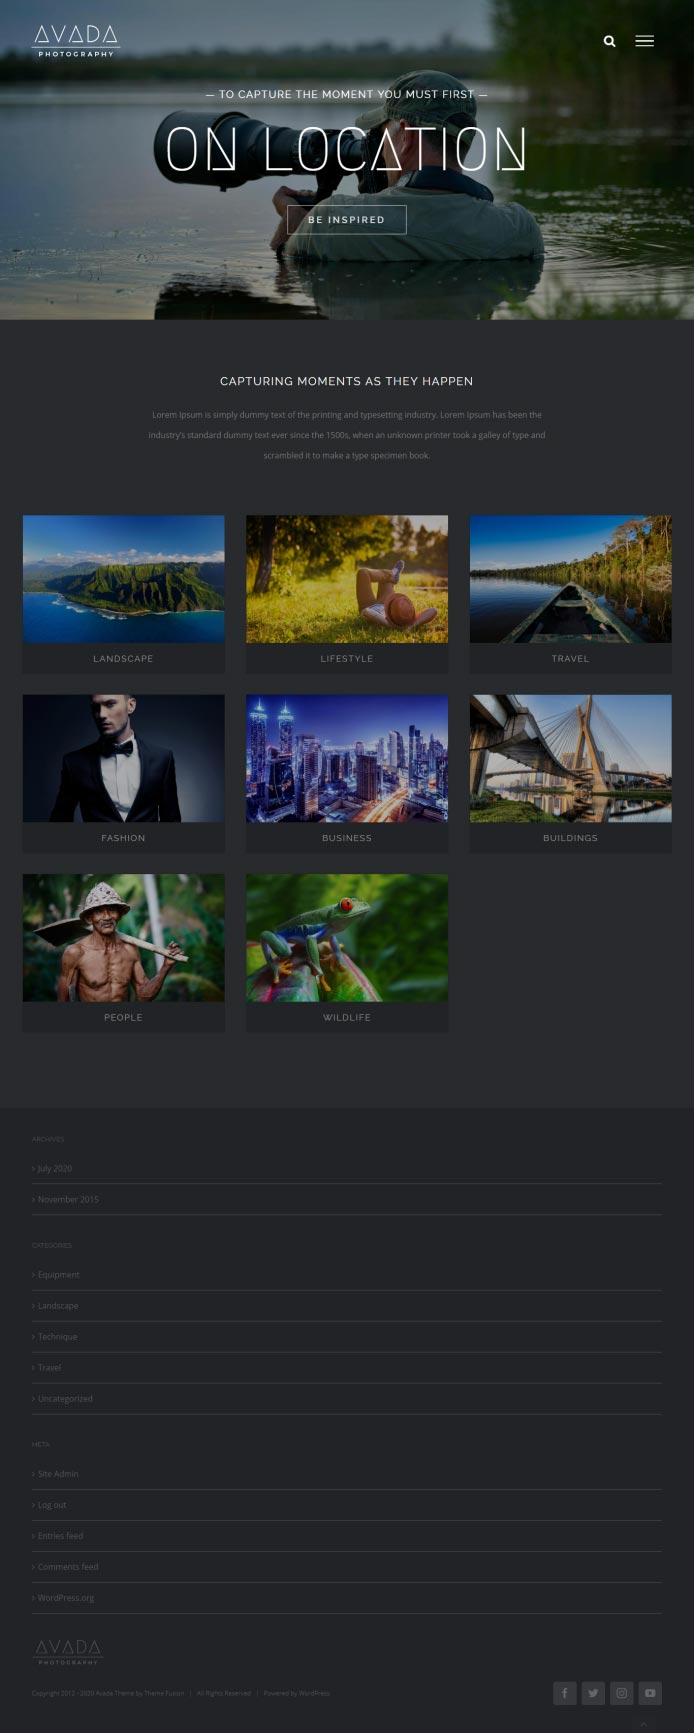
Avada by ThemeFusion ($60)

Avada is the #1 selling theme of all time on all popular WordPress theme marketplaces with over 600,000 sales and counting.
It is also the most used all-in-one multi-purpose WordPress theme at the moment. Built by the company ThemeFusion, Avada uses a drag-and-drop Fusion Builder to make website customization simple even for those without single coding experience.
After installing the Avada theme (installing the theme is done in the same way we installed the X theme), go to the Demo tab if you’d like to install one of their demo templates as a starting point.
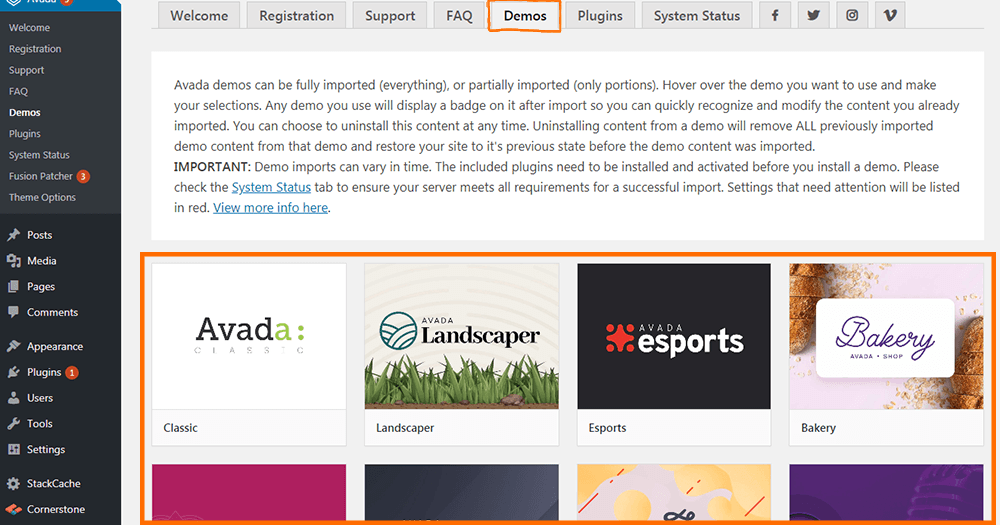
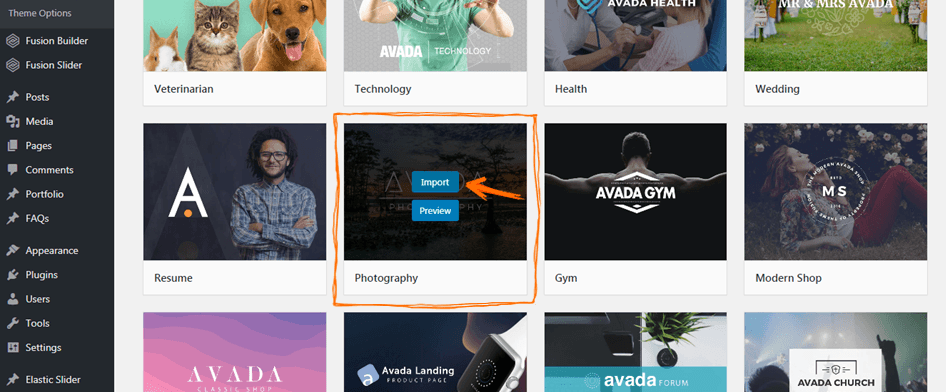
Hover over to any demo template, click on Preview to see the live preview; if you like it, click Import to import the template. You can import as may demo as you’d like; you only have to activate the one you want to use at any time.
Once you click on Install, a pop-up will show you the plugins required to import the contents. Install and activate all the required plugins. After that, tick the All box to import the demo content of the selected template. Then click on Import.
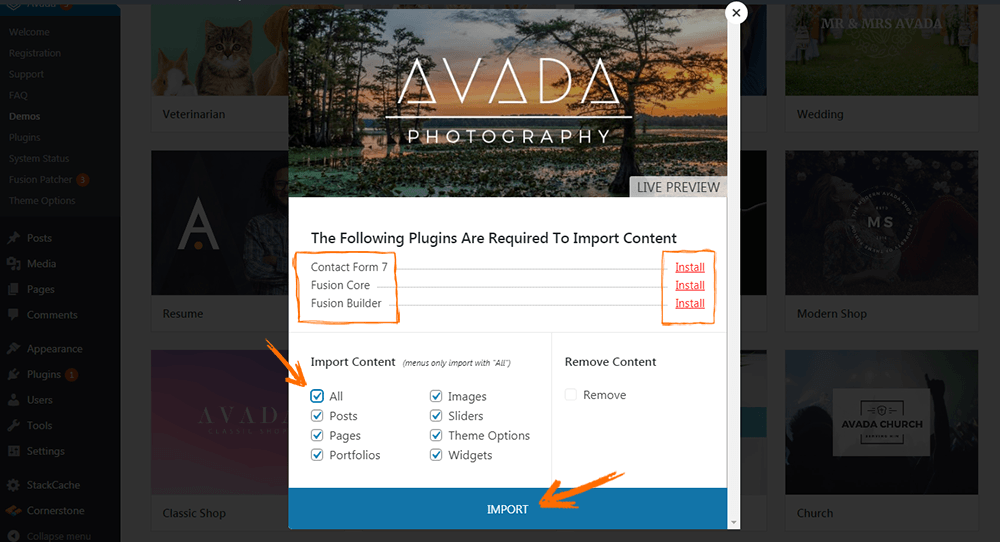
Congratulations! You’ve successfully imported the demo template, now open a new tab on your browser and type in your domain to see how your new website looks like.
 The7 by Dream-Theme ($39)
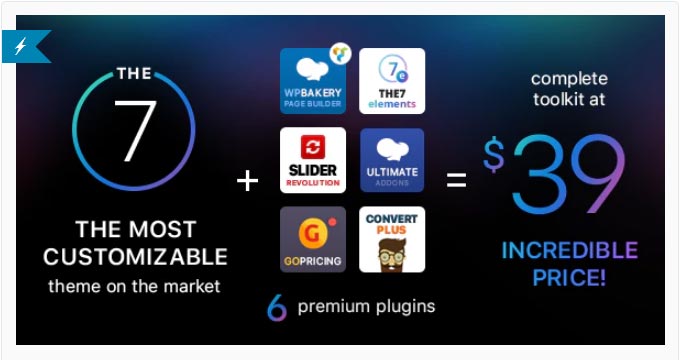
The7 is another top-selling theme on Themeforest at the moment. It features full and seamless integration with WPBakery Page Builder (formerly Visual Composer) and Ultimate Addons.
Having over 1000 Theme Options, almost any imaginable design can be crafted with The7 theme. The Design Wizard feature lets you create a professional website in a matter of a few minutes.
The following premium plugins are bundled with The7 theme.
- WPBakery Page Builder (formerly Visual Composer)
- Ultimate Addons
- Slider Revolution
- Layer Slider
- Go Pricing Tables
- ConvertPlus
It is also fully compatible with most prevalent plugins like WooCommerce, Yoast SEO, etc.
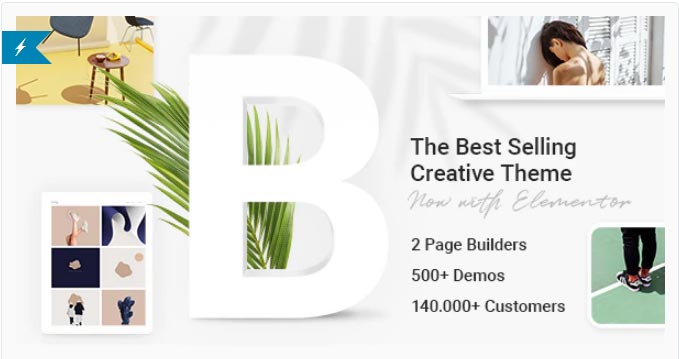
Betheme by Muffingroup ($59)
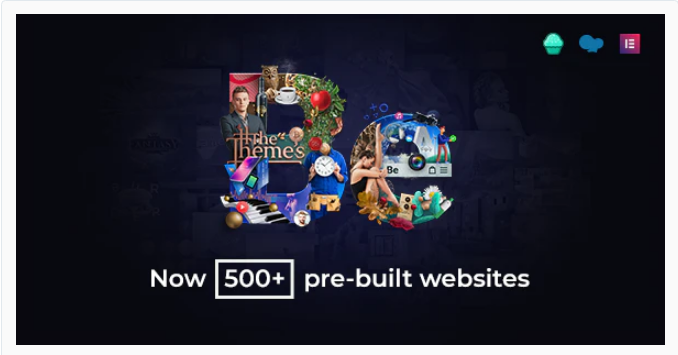
With 500+ Ready to use pre-built websites and 1-click installation, Betheme gives you unlimited possibilities. Betheme is well suited for portfolio websites. With its drag-and-drop feature, anyone (including those without coding experience) can easily build professional-looking websites with it.
Impreza by UpSolution ($39)

With Impreza, there’s no limit to what you can customize to align with your specific needs. It is a perfect fit for a portfolio website. Bundled with over 220 pre-made web page demos, Impreza also comes with a visual drag-and-drop builder and a 1-click demo installer.
Bridge by QODE ($59)
Bridge is a retina multi-purpose WordPress Theme with over 500 demos and 2-page builders built on the compelling and flexible framework by QODE.
Any of the example demo sites can be imported seamlessly by choosing your favorite design or style, then import pages and settings with the 1-click import feature. With the Bridge theme, you can have a fully equipped website set up and running within just a few minutes.
Enfold by Kriesi ($59)
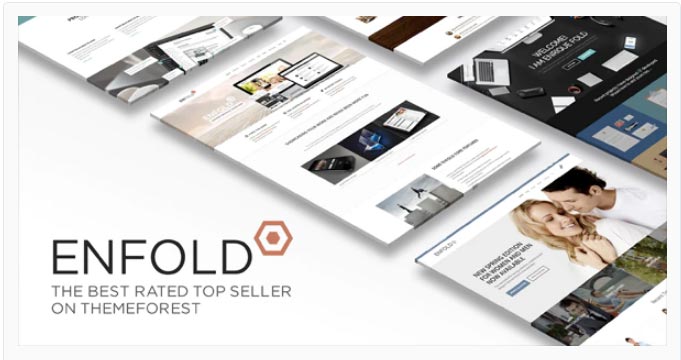
Enfold is a clean, super flexible, fully responsive WordPress theme by Kriesi. Enfold can be used to design any type of website ranging from neat portfolio websites, business websites, Agency websites, online shops, and much more. Built on top of the Avia Framework, Enfold offers a multi-language plugin that includes over 20 languages.
Jupiter X by artbees ($59)
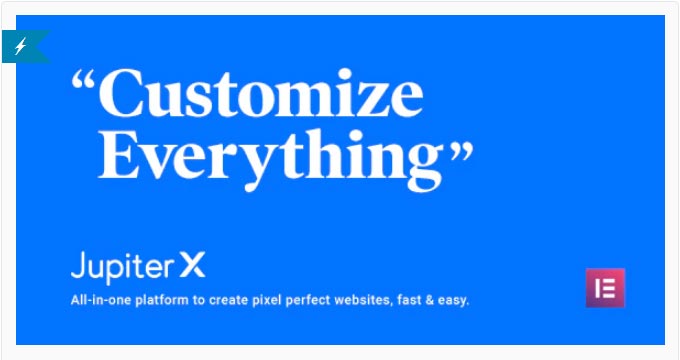
Jupiter X is your all-in-one theme to create easy pixel perfect websites with speed. Bundled with Elementor page builder (the world’s leading WordPress page builder), you can customize Jupiter X directly using the WordPress customizer. Apart from that, you can now build your own headers and footers effortlessly using the visual editors.
With well over 300 pre-made website templates, Jupiter X also comes with hundreds of page block templates to save time and bring inspiration. New websites and block templates for Jupiter X are released every month.
Uncode by undsgn ($59)
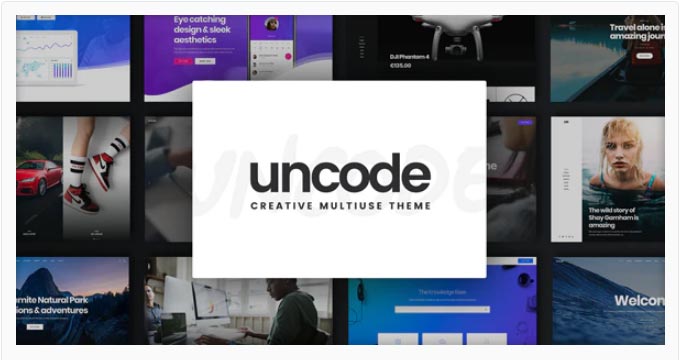
Uncode is a pixel-perfect creative WordPress Theme. It is based on a personalized and improved version of the popular WPBakery Page Builder. Uncode is a multi-purpose theme, neat, flexible, and suitable for every website design. It can be used for a portfolio website, agency, freelance, business, services, startup, photography, event, artist, music, etc.
With over 70 professionally designed demo layouts, you can import and customize to your taste. Moreover, with the Uncode Wireframes Plugin, you can also import over 400 section templates that can be combined to create a complete website or independent landing page. You can virtually build anything you want without touching or even seeing a single line of code.
TheGem by CodexThemes ($59)
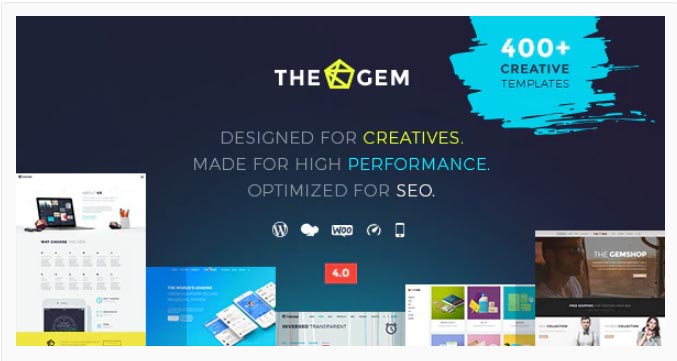
TheGem is a multipurpose, responsive, high-performance WordPress theme with a modern artistic design to suit all creative uses for web design.
Designed and developed by CodexThemes, TheGem is an ultimate web building toolbox of design elements, styles & features. You can build an awesome, professional high-performance website in a few minutes without even knowing how to code.
It is packaged with over 40 distinctive multi-purpose design concepts, 150 superb demo pages, 8 navigation settings in over 20 styles, and flexible page layouts. It is perfect for building a portfolio website and any other type of site within a few minutes.
TheGem is built with creative passion at heart with dazzling slick designs, and every artistic person will really love it.
Recommended themes for your portfolio website (free)
Apart from all the premium/paid themes listed above, there are free themes that you can use to create a beautiful portfolio website.
Once you install WordPress in your hosting account, you’ll have access to WordPress’s numerous free themes.
How to find a free theme from your WordPress account
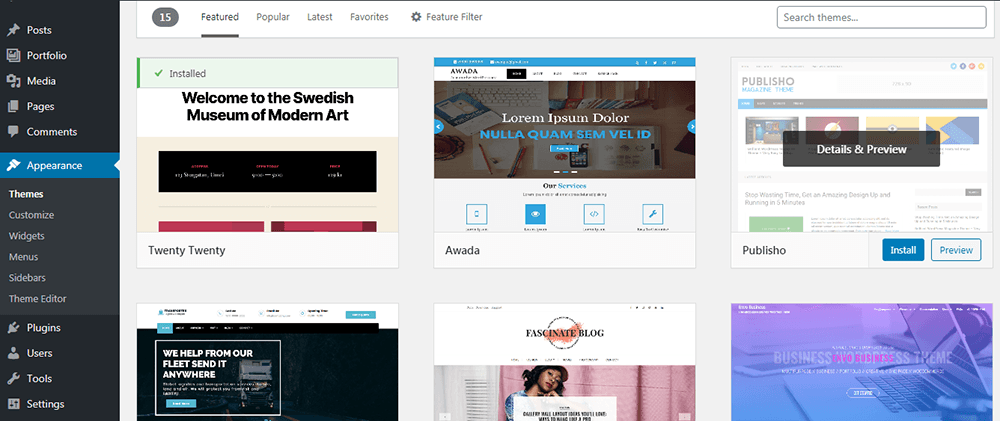
To use a free theme, you will have to find the theme by logging into your WordPress account. Hover over to Appearance and click on Themes.
On the Themes’ page, click on “Add New.”
On the “Add New” page, you can see the featured themes, and there is still so much more. You can actually filter the themes to get what you want.
Using the filter menu, we can filter themes by; Popular, Latest, and Favorites. Just a click on the “Latest” filter returned 7,656 theme results:

If you have a preferred niche in mind, you can use the search box. So, to find a portfolio theme, you can either click on the “Featured” tab, or type “portfolio” in the search box to see all the portfolio themes. The search returned 863 theme results.

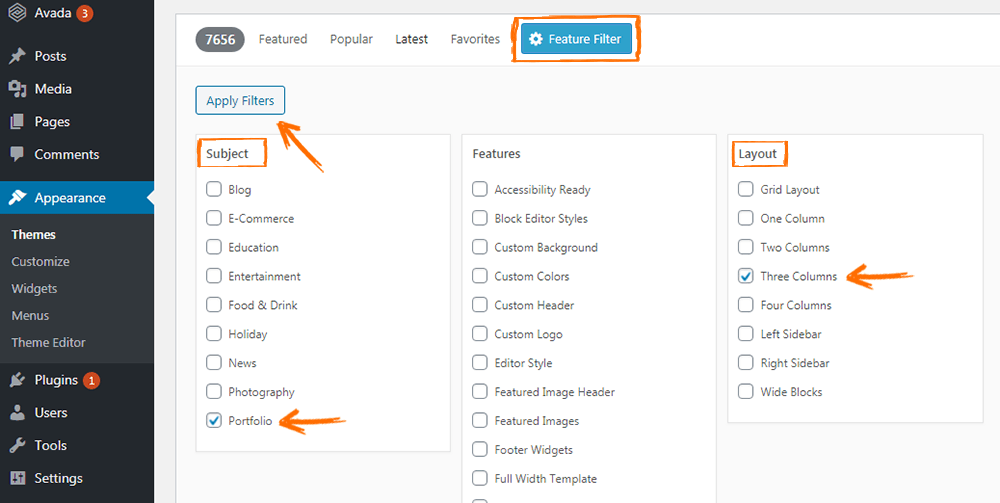
You can choose to narrow your search further using the Feature Filter tab.
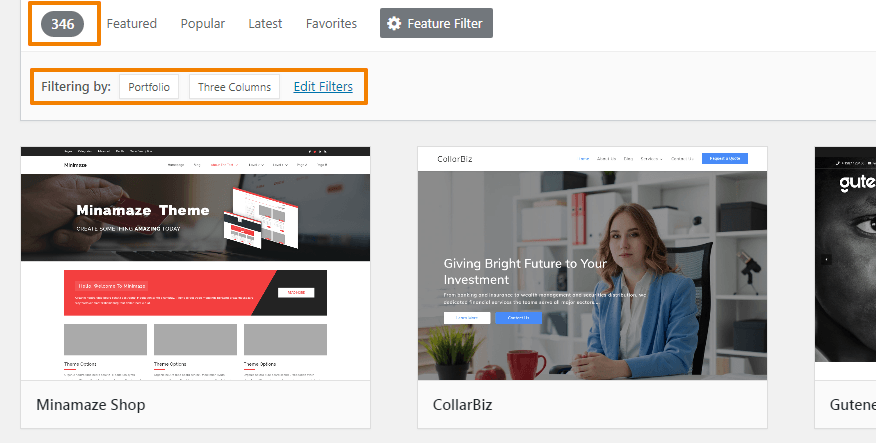
Typically, using that tab most times is unnecessary, especially if you’re a beginner. Still, there’s no harm in trying it out. Let’s select Portfolio under Subject heading, and Three columns under Layout heading, then click on Apply Filters.
After that, we’re now left with 346 themes.
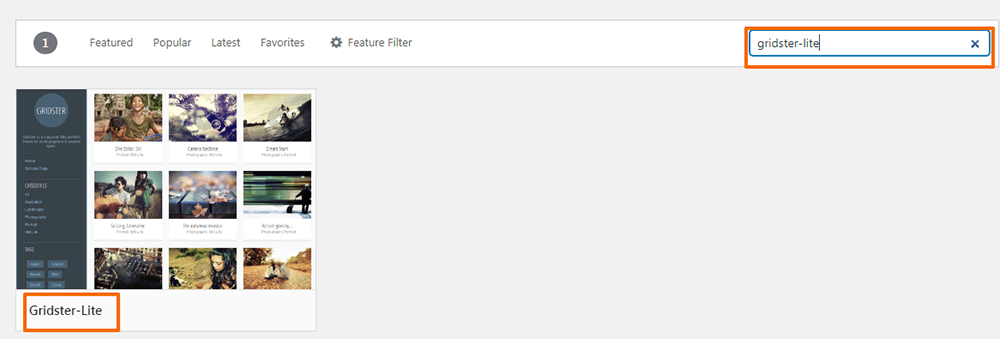
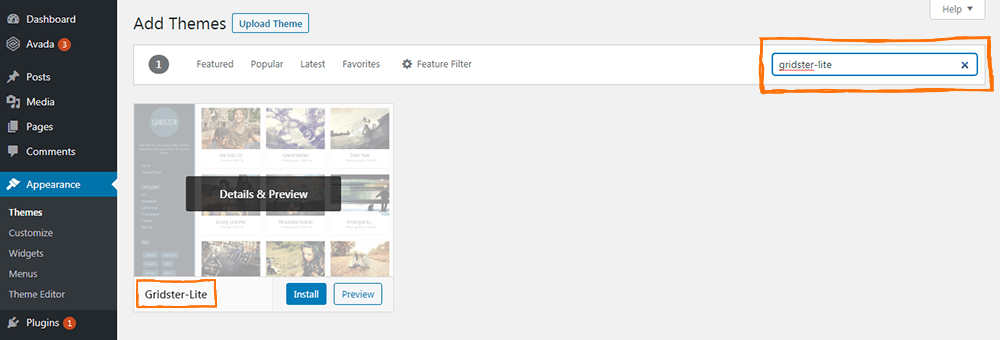
Finally, with the search themes box, you can search for a theme if you already know the name. Let’s search for Gridster-Lite; that’s the free theme we will use in this example.
Our search returned three results; we’ll use the first one.
Now that you’ve seen how to filter free themes to get your desired theme on WordPress. Let’s look at how to design a portfolio website using one of the free themes, Gridster-Lite.
Using the Gridster-Lite free theme
In this part, we’ll learn how to design a portfolio website using the Gridster-Lite free WordPress theme.
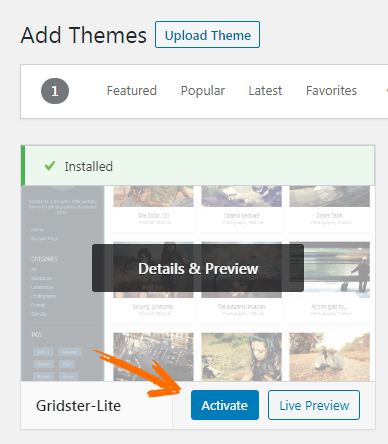
Having searched and found the theme, hover over it and click on Install. You can preview to see what our website will look like.
Once installed, click on Activate.
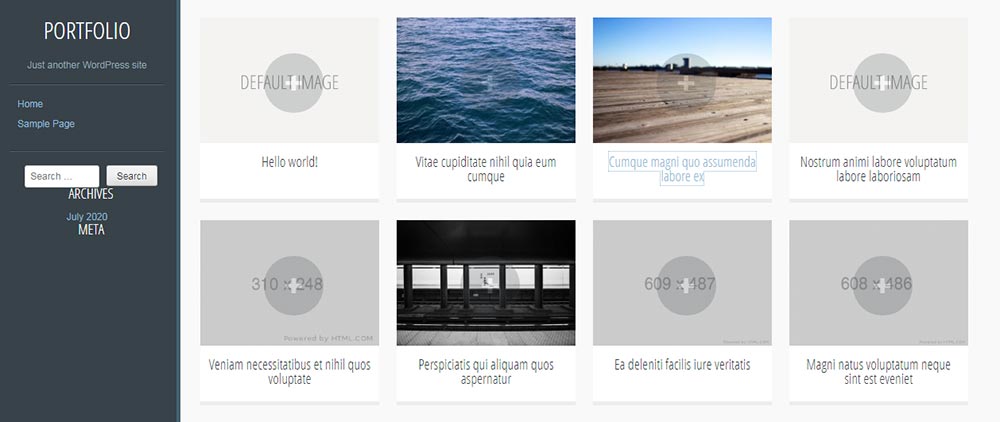
Let’s look at how our website looks with the new theme:
Step 4: Adding your demo-reel
Many of the themes we covered have unique page builders or templates you can import to create great looking portfolio websites.
however, I wanted to make sure you know how to create a page, add your demo-reel to it, and set it as your default homepage, in case you wanted to do things yourself.
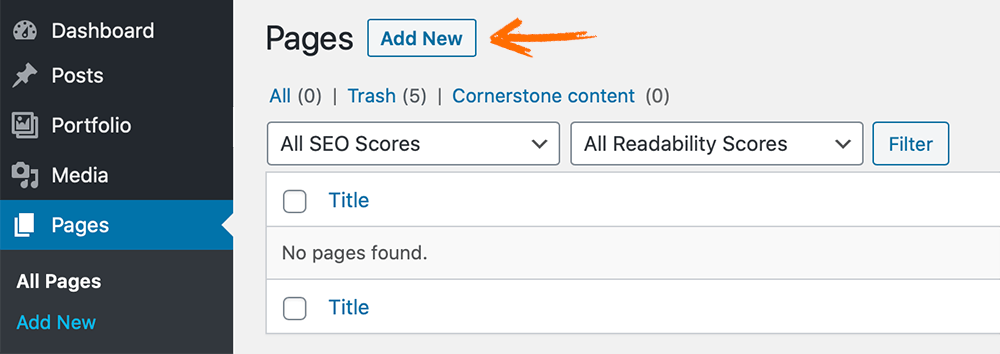
So first, lets add a new page:
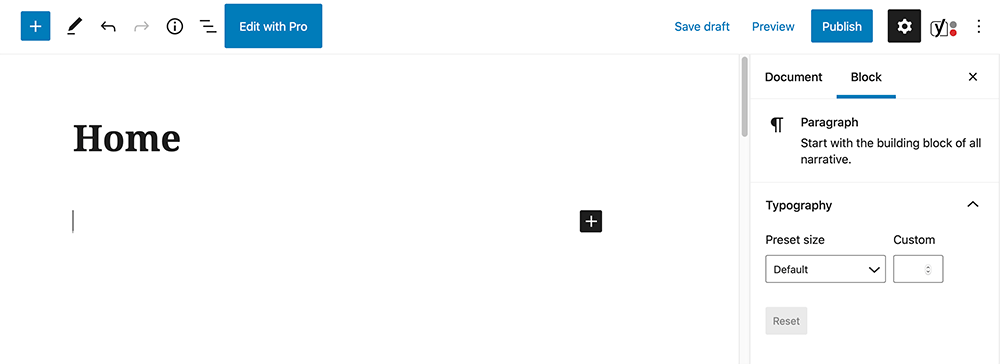
Then you’ll be directed to the page editor, most likely using the block editor. The block editor is a really nice way to build pages in WordPress without using any theme or plugin. Let’s name our page “Home”.
The block editor lets you build pages with “blocks”, which are basically different pieces of a page, created with default settings. They could be chunks of text, or in our case – an embedded video.
Click on the black plus sign to add a new block:
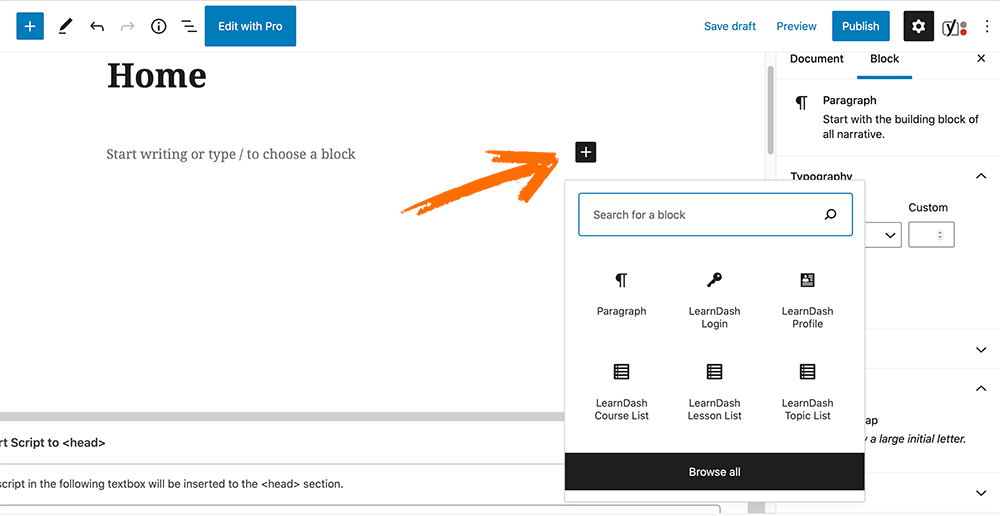
Then your most recently used block will appear, but we can either browse all the different blocks or search for the one we want.
We know we’re looking to add a video to this page, so let’s type “video” in the search bar:
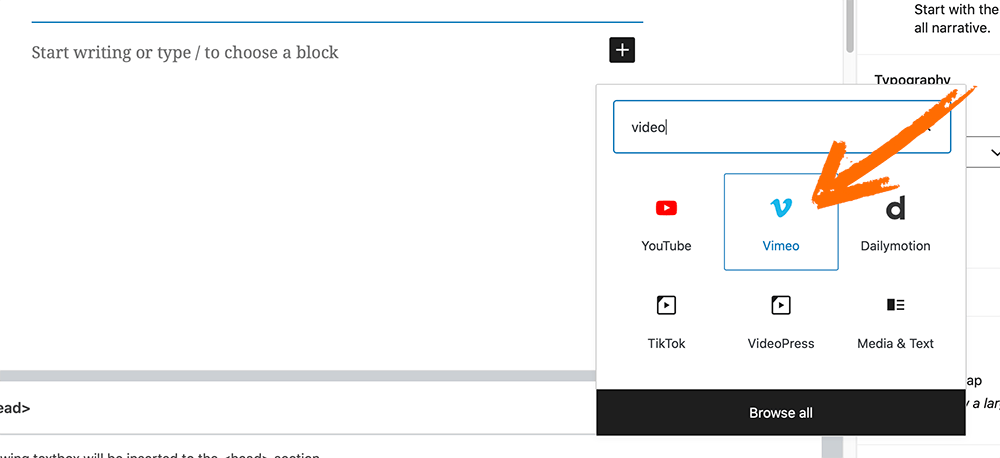
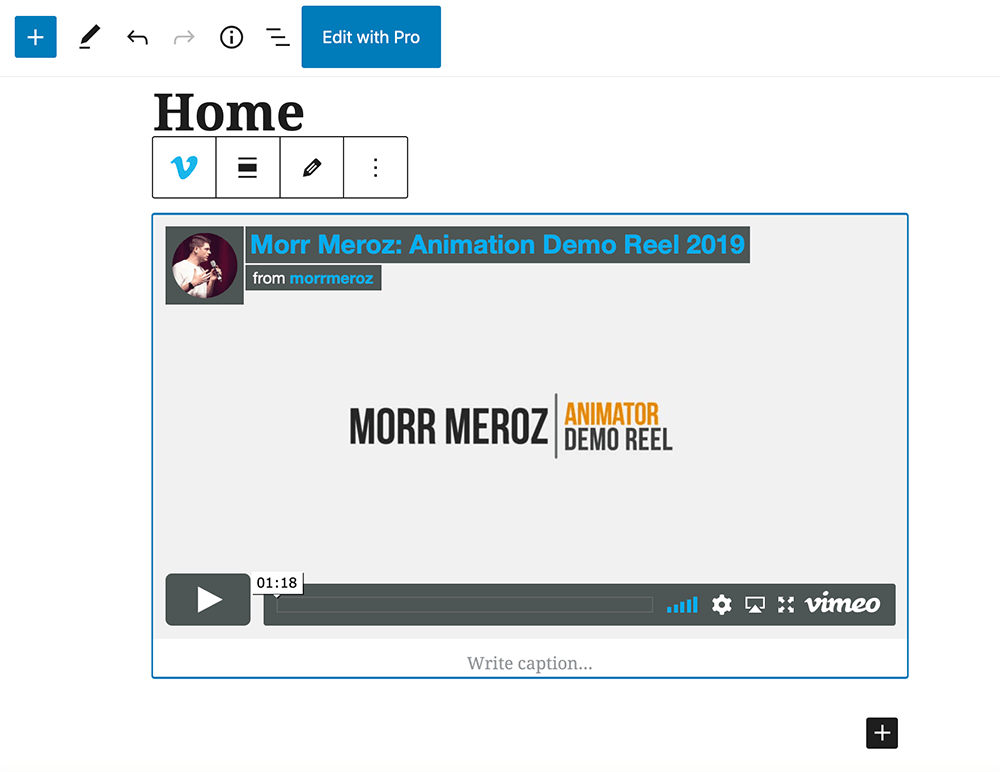
We are presented with a few different options to embed our video. In this case we’ll pick Vimeo, but you can use YouTube and others as well.
After picking Vimeo, we’ll enter our demo reel’s vimeo URL and click “Embed”.
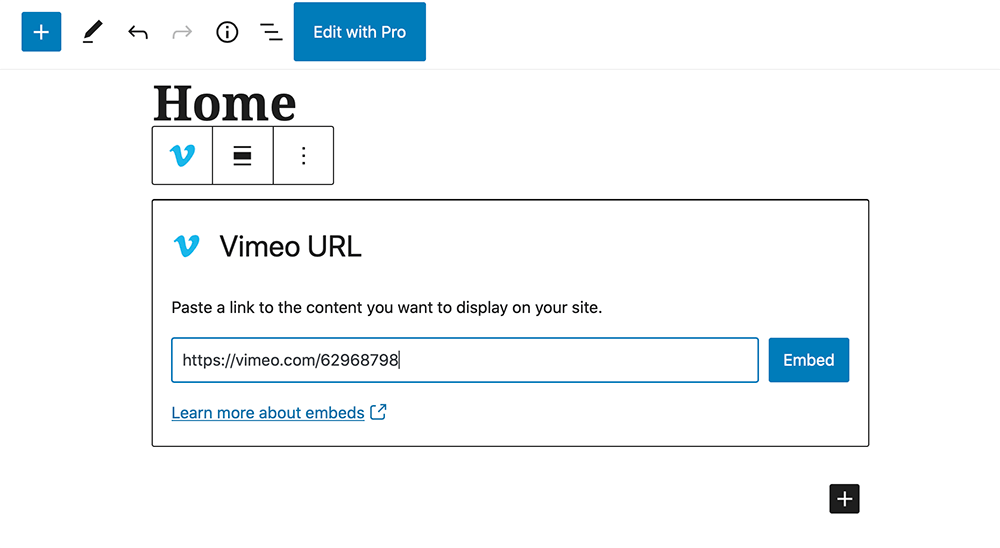
Our demo reel was now added to the page.
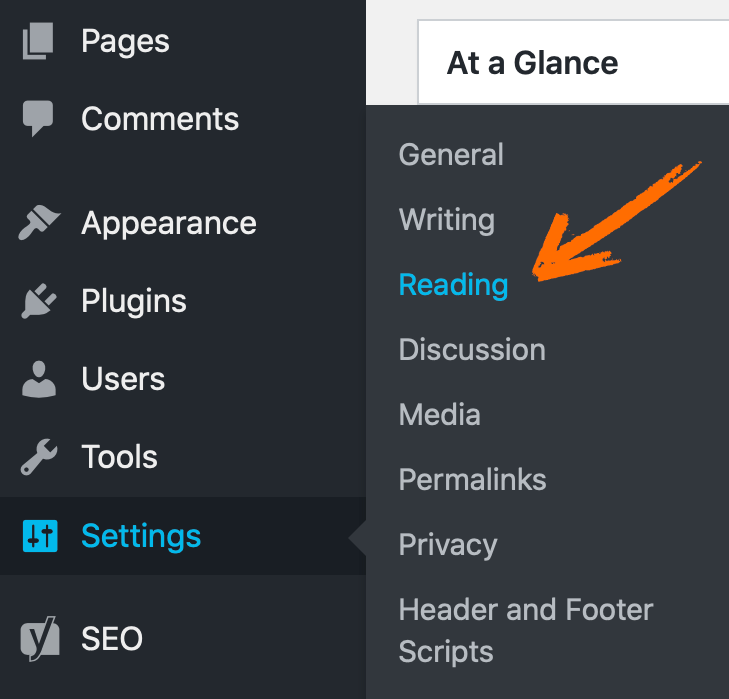
Now let’s set this page to be our default homepage.
Go to Settings -> Reading:
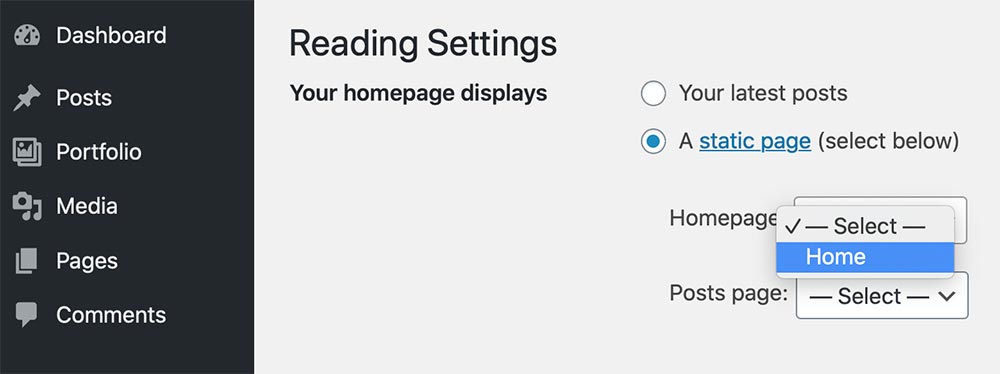
Select a static page to be displayed as your homepage, and pick the page we just created (named “home”).
Now when we go to our website, this is what we’ll see our demo-reel, front and center.
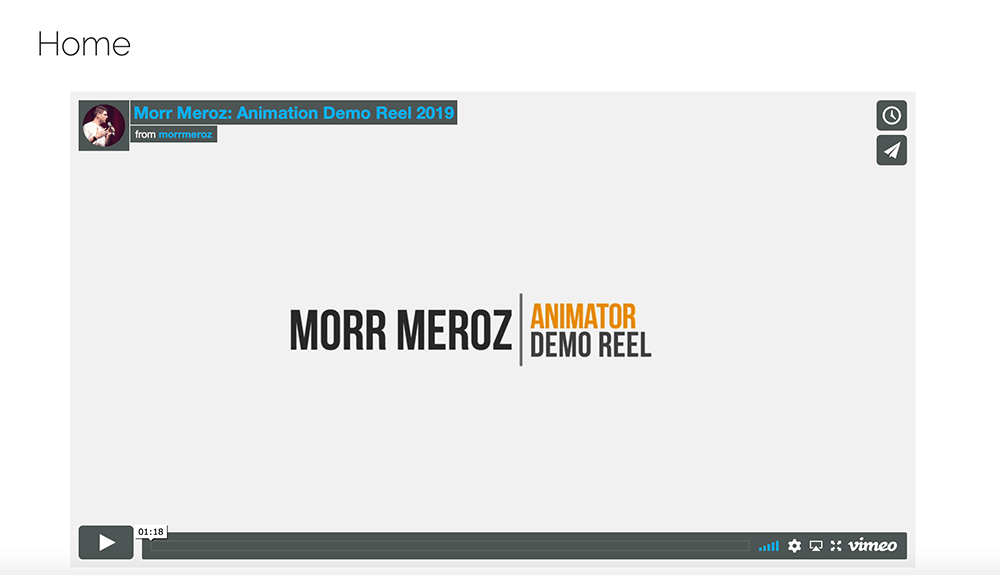 Yes, the design isn’t anything to write home about, but now you know how to create and edit your homepage. Try exploring other blocks, templates and page builders to find the one the works for you!
Step 5: Website design guidelines
Now that we know how to build a portfolio website, I want to talk a bit about some basic design concepts to keep you on the right track to create a great looking, but also effecting website.
The first thing you need to keep in mind is keep it simple. Repeat this mantra through the entire time working on your site.
If you don’t have design experience your tendency will probably be to overcomplicate things, add more information than necessary, and add as many elements as you possibly can. Especially since these template platforms offer so many cool options. You might think it’s a great idea to include a maps widget with your location on the homepage, but it’s not a great idea. Stick to the basics.
Most importantly, remember who you’re making this site for. You’re not making it for yourself, you already know everything about you. You’re making it for industry people who want to know more about you. They want some brief information about you, see some of your work, and a way to contact you. That’s it. Anything that isn’t those things is probably unnecessary.
Single page vs. Multipage
There are 2 common approaches to a personal portfolio website. The single page layout and the multipage.
A single page website is one single webpage with a bunch of menu items on top that lead to different parts of the page, so the viewer stays on the same page the whole time.
A multipage website is when you break down the website to individual pages, one for each purpose. Like a contact page, or a bio. Then the navigation menu transfers you to the appropriate page.
Picking a layout is your choice, it’s a matter of taste, but if you don’t have too much stuff to put on the site, or if you can’t decide, the safest option is to go with is a single page layout.
It’s the most considerate option for your readers, as you make it easier on them to get all the information the need in one place. I personally think it’s the better option.
I actually used a multipage layout for my own portfolio website, because I had a lot to write in each section, I had a page for my short films, a page with my personal bio, and I wanted a dedicated menu option to link to my blog on bloopanimation.com.
But even though I used a multipage I still treated my homepage as a mini one page layout, by including a picture, a short headline that sums up who I am, a longer paragraph with a more detailed bio, a link to my blog and a list of my short films.
That way if someone hops on the site and doesn’t want to start browsing, they can still get all the info from that one page.
I have a lot of respect for the time of my readers and I want to make sure I do everything I can to make it easier on them when they take the time to look into what I’m all about.
Goals
Make sure you know what the goal of your website is. My goals with the website might be different from yours.
I’m trying to provide some basic information about me and positioning myself as an animation director. I’m not trying to get hired as an animator anymore, so I don’t even have my demo reel on the site at all.
I used to though, when I was still working in studios, and back then the first thing you would see on my homepage was a big video of my demo reel, waiting for you to click on to watch. I did that because I knew people who are visiting the site are probably from a studio considering to hire me, so I wanted to make it as easy as possible for them to check out my work.
Work on your homepage so it delivers what your readers are interested in the most. Put that thing front and center.
Conclusion + Resources
Thank you for sticking through this massive guid, I hope it was helpful.
For your convenience, I’ve gathered all the different resources mentioned in this guide below, so you can refer to them at any time.
Good luck with your work!
Resources:
Website Hosting
- Wix.com: For beginners who want easy-to-use pre-made solution.
- Bluehost: For those who want more control, but don’t wanna spend a lot of money.
- Kinsta: For those who want the most advanced premium solution, and don’t mind paying for it.
Themes
- X theme
- Avada by ThemeFusion
- The7 by Dream-Theme
- Betheme by Muffingroup
- Impreza by UpSolution
- Bridge by QODE</a
- Enfold by Kriesi
- Jupiter X by artbees
- Uncode by undsgn
- TheGem by CodexThemes
Articles
The post How to Create a Portfolio Website: A Detailed Guide appeared first on Bloop Animation.